DIY sprinkler system installation: the order of work, from permit and backflow to the final catch-cup test
How to install a sprinkler system yourself in the US, in the order that avoids digging twice: code and permit, pressure and flow, design and parts list from a scaled drawing, 811, the backflow tie-in, valves, trenching, flushing, heads, wiring, pressure test, and the first schedule.

The order matters more than the tools
A DIY sprinkler system is very doable with basic skills, two weekends and a few rented tools. Where DIY goes wrong is rarely the gluing or the digging; it is doing the steps in the wrong order: buying heads before measuring flow, trenching before the layout is checked, burying pipe before a pressure test. This guide is the order of work we recommend, with the US-specific steps that European guides skip.
Step 1: check code, permit and the backflow requirement
Before anything else, find out what your city and water utility require. Almost everywhere, a sprinkler system connected to drinking water needs a backflow preventer: anti-siphon valves for each zone where they are allowed, or a pressure vacuum breaker or reduced-pressure assembly on the mainline. Many cities require a permit and an inspection, some require that the tie-in and backflow device be installed by a licensed professional, and many require an annual backflow test. Knowing this first decides your layout (above-ground anti-siphon row or valve box with a PVB) and your budget.

Step 2: measure pressure and flow
Two numbers decide everything else. Static and working pressure with a gauge on an outdoor hose bib, and available flow with a 5-gallon bucket and a stopwatch: a bucket in 22 seconds is about 13.6 GPM. If static pressure is above 80 PSI, the plumbing code calls for a pressure-reducing valve on the house; if the house already has one, its setting is your starting pressure. Full method: /enHow to measure water pressure for irrigation.
Step 3: design on a scaled drawing, then count the zones
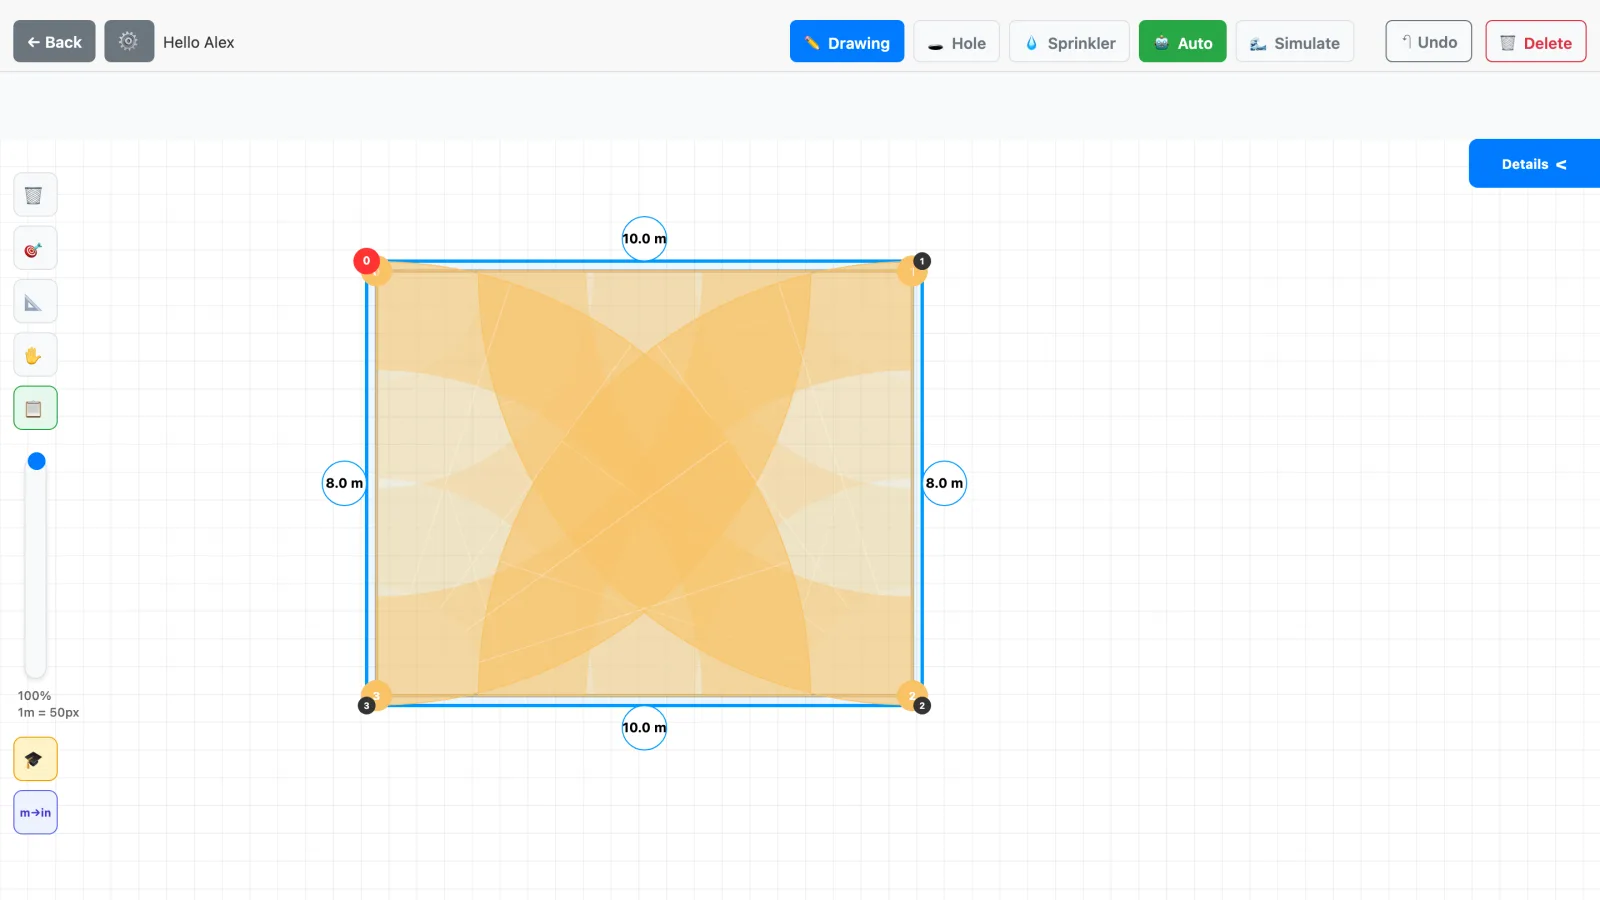
Draw the yard to scale before buying a single fitting. In SprinklerMap you trace the perimeter from your measurements or on the satellite map, cut out patios and walks, and let auto placement lay out heads head-to-head. On our case study lawn of 33 × 26 ft it placed four rotors with a 26 ft radius and 89.5% calculated coverage; the wetting simulation shows weak spots while fixing them is still a click.
The design also answers the hydraulic question: the app adds up the GPM of the placed heads, you compare that with the flow you measured minus a 20% margin, and if demand is higher you split the area into more zones. Spacing rules: /enSprinkler Head Spacing: The One Decision That Decides Whether Your Lawn Goes Brown. The whole case study, step by step: /enHow to design irrigation for a rectangular garden.
Step 4: the parts list comes from the drawing
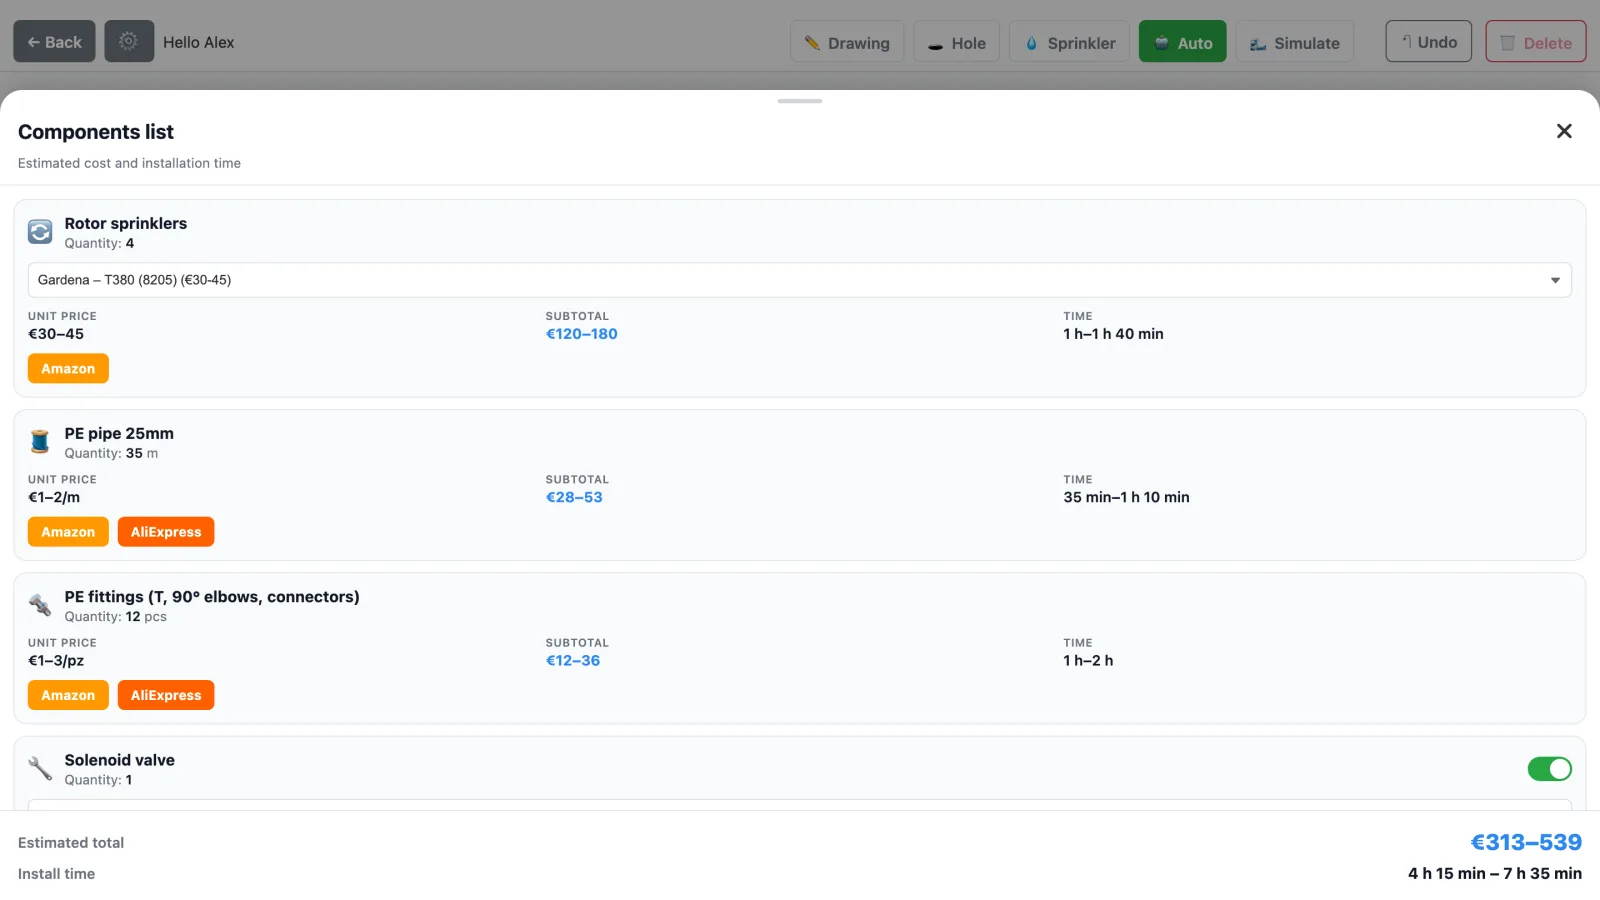
With the design done, the shopping list is counted on the drawing, not guessed: heads, feet of pipe by run, fittings, valves, controller and sensors, each with an install time. Add the US-specific items the drawing cannot know: the backflow device your code requires, a valve box or an anti-siphon row, burial-rated multi-conductor wire, gel-filled connectors, PVC primer and cement, and swing joints for every head. Pipe types and sizes for the US: /enSprinkler pipe and fittings: PVC vs poly, Schedule 40 vs Class 200, and what size you need.
Step 5: call 811 and mark the yard
Call 811 a few working days before you dig, as your state requires, and wait for the public utility marks. Then find the private lines yourself: landscape lighting, a gas or power line to a grill or shed, an old irrigation main, a septic field. Mark head positions with flags and trench routes with marking paint, and check the distances against the plan with a tape before anything gets dug.
Step 6: tie-in, backflow device and valves
The point of connection taps the supply after the meter, with a shutoff valve for the irrigation. Then comes the backflow protection your code requires: an anti-siphon valve per zone, mounted above ground at least 6 in above the highest head it serves; or a pressure vacuum breaker, mounted above the highest head in the whole system, feeding inline valves in a valve box; or a reduced-pressure assembly. This is the part where many jurisdictions want a permit, an inspection and sometimes a licensed installer. Valve choices and wiring: /enSprinkler valves explained: anti-siphon or inline, how they work, how to wire them, and how to fix the common faults.
Step 7: trench and lay pipe
Laterals usually go 6 to 12 in deep, the mainline somewhat deeper; in freezing climates the system is drained or blown out every fall rather than buried below the frost line, so plan low-point drains or a blowout port now. Route trenches along edges, keep sod strips moist to relay them, and use a rented trencher or vibratory plow for long runs. Glue PVC with primer and cement, or use insert fittings and stainless clamps on poly. How deep and how to route: /enHow to bury irrigation pipes: depth and techniques.
Step 8: flush, then set heads at grade
Before any head goes on, open each zone with the riser ends uncapped and flush the dirt and PVC shavings out of the laterals; otherwise they end up in the first nozzle screens. Then install each head on a swing joint or funny pipe, set the cap flush with the finished lawn surface so mowers roll over it, and turn the arcs to the plan.
Step 9: wire, pressure-test with open trenches, backfill
Run burial-rated multi-conductor wire from the controller to the valves with one spare conductor, and make every splice with a gel-filled connector. Then pressurize the mainline and leave it for 15 minutes while you walk every joint; run each zone and check that every head pops up, turns and retracts. A leak found now is a two-minute fix; after backfill it is an evening with a shovel. Backfill in layers and water it in so the trenches do not sink into ruts.
Step 10: first schedule, then tune
Program early-morning starts, within any watering days or hours your city sets, with run times from the soil and nozzle type: /enHow long to run sprinklers: minutes per cycle by soil and head type, with the math behind them. Add the rain sensor now; a WaterSense labeled controller may qualify for a utility rebate. After one or two weeks, run a catch-cup test on each zone (/enThe catch-cup test: measure sprinkler uniformity and your real inches per hour) and adjust arcs, radius and minutes. What to check in the first month: /enNew sprinkler system: the first-month tune-up, and the common problems with cause and fix.
Write down the final program and the valve-to-zone map. Next spring, and the day a valve needs fixing, that page is worth an hour.
Frequently asked questions
Can I install my own sprinkler system?
In most places the trenching, pipe, valves, heads and controller are DIY work. The connection to the potable supply and the backflow preventer are a different matter: many jurisdictions require a permit, an inspection, and in some cases a licensed plumber or irrigator for that part. Check with your building department and water utility before you start.
How long does a DIY sprinkler install take?
For a typical home lawn, plan two weekends: one to design, mark out and trench, one to lay pipe, set heads and test. A rented trencher turns most of the digging into a few hours. The 33 × 26 ft lawn in our case study came out at about 4 to 7.5 hours of installation in the app estimate, not counting the tie-in.
Do I really have to call 811?
Yes. 811 is the free national call-before-you-dig number, and it gets public utility lines marked before you trench. It does not mark private lines such as landscape lighting, an old sprinkler main or a line to a shed; find those yourself.
Recommended products
These product links are affiliate links: if you buy on Amazon or AliExpress through them it costs you nothing extra, but it helps us keep SprinklerMap alive as a project and create new useful content.
These products are catalogued in our brand database, with the same description and price range you find on the manufacturer page.

| Model | Type | Description | Radius (m) | Price (€) | Buy |
|---|---|---|---|---|---|
| 💧 Pro-Spray PROS-04 | Pop-up | Fixed 10 cm pop-up body with ½" inlet, compatible with Pro fixed nozzles and with MP Rotator nozzles. The nozzle is bought separately and chosen for the radius required. | 2.5–10 m | €3-9 | Amazon |
Other suggested products
Products not in the brand catalogue: generic material, tools and accessories where the right size matters more than the brand.
| Product | Description | Price (€) | Buy |
|---|---|---|---|
| Rain Bird DIY irrigation kit | Complete kit with sprinklers, fittings, pipe and instructions for gardens up to 200 m². Every component is compatible with the others: ideal for a first DIY system with no prior experience. | ~€80-150 | Amazon |
| 4-zone battery irrigation controller | Digital 4-zone timer powered by a 9V battery, no mains wiring. Independent weekly programs per zone, rain sensor input. Plug-and-play solution for DIY systems. | ~€40-80 | Amazon |
| Hunter Pro-Spray 4" pop-up sprinkler | Hunter Pro-Spray 4" pop-up body, compatible with MP Rotator and standard spray nozzles. Built-in sand filter, check valve included. The standard for residential systems. | ~€8-18 | Amazon |
| Poly or PVC pipe for laterals (3/4 in to 1 in) | Laterals in Class 200 PVC across most of the US, or IPS poly pipe in cold climates. Size each run on its zone flow and length with the friction loss chart, and keep the mainline to what your local code requires. | ~€20-60 | Amazon |
| Product | Description | Price (€) | Buy |
|---|---|---|---|
| Pop-up spray heads 4" (set) | Set of 10 cm pop-ups with adjustable nozzles and the standard 1/2" thread: handy as spares or to finish secondary zones. | ~€12-30 | AliExpress |
| Irrigation solenoid valve 3/4"-1", 24V AC | Solenoid valve compatible with standard 24V controllers. Good as a spare: check the thread and whether flow control is included. | ~€8-20 | AliExpress |
| PE compression fitting kit, 16-25 mm | Assorted elbows, tees, couplers and end caps for PE pipe. Handy as a spares box: fittings always break on a Sunday. | ~€10-30 | AliExpress |
Technical note: Code requirements (backflow device type, permits, licensed work, PRV above 80 PSI) are set by state and local jurisdictions; this article describes common US practice, not your local code. Install times and parts lists for the case study were generated by SprinklerMap on the drawing shown.