Pressure reducer for irrigation: when you need one and how to install it
How to detect excess pressure, which reducer to choose, and where to install it to protect nozzles and valves.

What is a pressure reducer and why irrigation needs one
A pressure reducer (also called a pressure-reducing valve or PRV) is a device that lowers incoming water pressure to a stable set value regardless of fluctuations in the mains supply. In irrigation, it protects sprinkler heads, solenoid valves, and drip emitters from damage caused by excessive pressure.
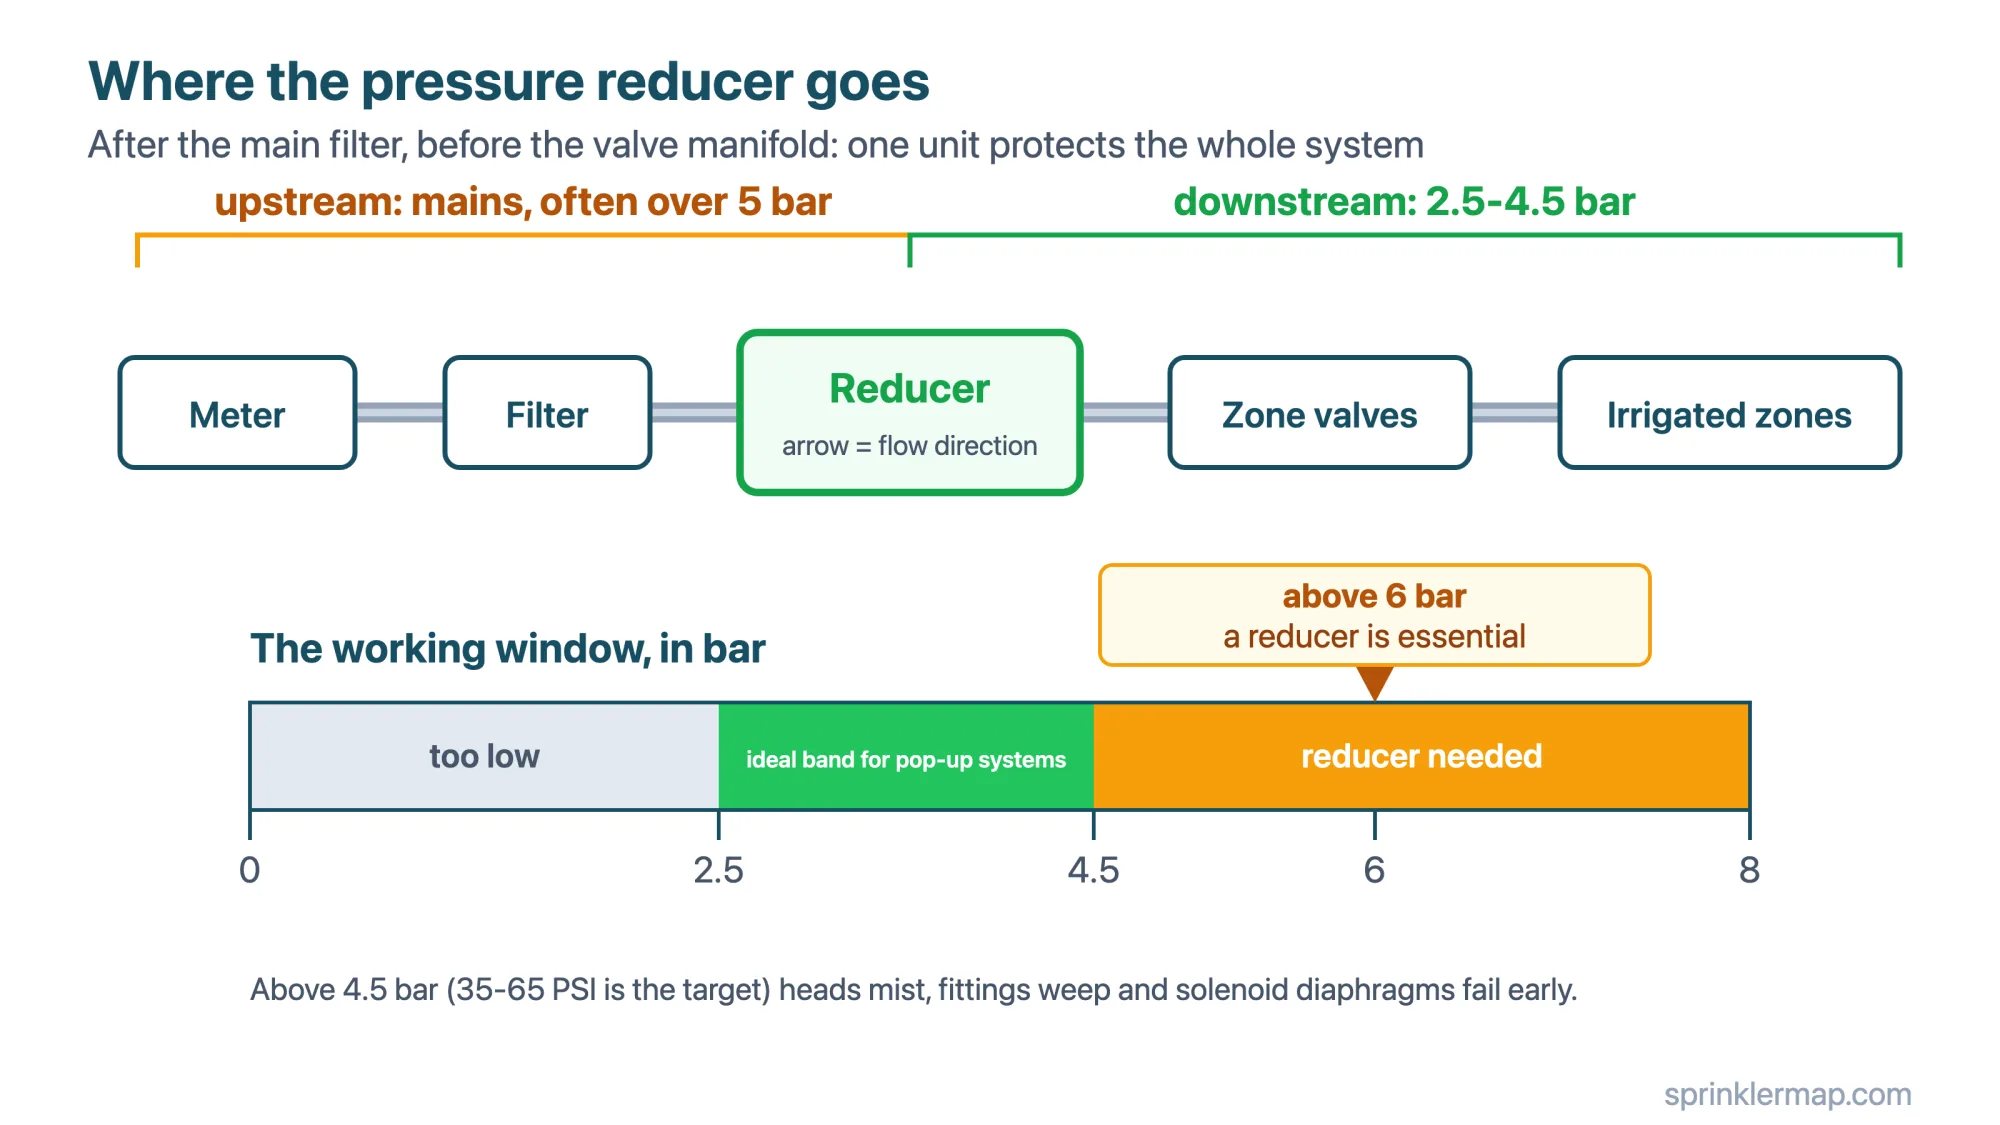
The ideal operating pressure for most pop-up sprinkler systems is 2.5–4.5 bar (35–65 PSI). Above 4.5 bar, pop-up heads mist instead of throwing a defined arc, fitting connections open at the joints, solenoid valve diaphragms deteriorate prematurely, and drip emitter orifices blow out or deliver erratic flow. A pressure reducer eliminates all of these problems for the cost of a €15–45 fitting.
How to tell if you need one
Measure static pressure at the garden tap with a pressure gauge (€10–20 at any hardware store). If the reading exceeds 5 bar, a reducer is strongly recommended. If it exceeds 6 bar, a reducer is essential — most solenoid valves and drip emitters are not rated above 8–10 bar, and pressure spikes (water hammer at zone shut-off) can briefly exceed the static reading by 50%.
Visible symptoms of excess pressure: misting from spray heads instead of a clean arc, pop-up nozzles that eject or rotate erratically, drip emitter connections that frequently pop off, and compression fittings that slowly weep at high pressure. Any of these symptoms warrants a pressure measurement before buying new components.

How a pressure reducer works
A pressure reducer contains a spring-loaded diaphragm. Incoming high pressure acts on one side of the diaphragm; the spring pushes back on the other side. When inlet pressure exceeds the spring's set force, the diaphragm moves to partially close the valve, throttling flow until the outlet pressure matches the set value. The balance is dynamic: the reducer adjusts continuously as flow demand changes.
Fixed reducers are pre-set at the factory (typically 2 bar or 3 bar) and cannot be adjusted. Adjustable reducers have a tension screw that compresses or relaxes the spring, changing the set pressure. For irrigation, adjustable models (€18–45) are preferred because the same reducer can be configured for spray zones at 3–3.5 bar or drip zones at 1.5–2 bar simply by turning the screw.
Where to install a pressure reducer
The standard position is after the main line filter and before the zone valve manifold. This placement ensures every zone operates at the reduced pressure, and the filter upstream of the reducer protects the reducer's diaphragm from sediment.
For systems that mix spray and drip zones with different pressure requirements, a second reducer can be installed specifically on the drip manifold, set to 1.5–2 bar. This gives spray zones 3–3.5 bar and drip zones their lower optimum simultaneously, without compromising either.
Always use pipe thread tape (PTFE) on the threaded connections when installing a reducer. Tighten finger-tight first, then add one and a half turns with a wrench. Do not over-tighten — cast brass threads are strong but not immune to cracking under excessive torque.
Setting the correct output pressure
Adjust an adjustable reducer with a pressure gauge installed downstream. Turn the adjustment screw clockwise to increase pressure, counter-clockwise to decrease. Set pressure while the system is running (dynamic pressure), not static — otherwise the actual operating pressure will be slightly lower than the set value.
Target pressures by system type: for spray head systems (pop-up spray or MP Rotators) set to 3–3.5 bar (43–50 PSI). For rotor systems (Hunter PGP, Rain Bird 5004) set to 3.5–4 bar (50–58 PSI). For drip-only zones set to 1.5–2 bar (22–29 PSI). For mixed systems with both spray and drip, set to 3–3.5 bar and add a secondary drip reducer on the drip manifold.
| System type | Set pressure | Notes |
|---|---|---|
| Pop-up spray heads | 3–3.5 bar (43–50 PSI) | Prevents misting and nozzle wear |
| Pop-up rotor heads | 3.5–4 bar (50–58 PSI) | Rotors need slightly more pressure for full throw |
| MP Rotators | 2.8–3.5 bar (40–50 PSI) | Lower than traditional rotors |
| Drip emitters | 1.5–2 bar (22–29 PSI) | Always use a dedicated drip reducer |
Pressure reducer for drip irrigation
Drip systems deserve particular attention because emitters are the most pressure-sensitive components in any irrigation system. A standard drip emitter rated at 2 L/h at 1.5 bar may deliver 4–5 L/h at 3 bar — doubling or tripling the intended application rate and causing waterlogging.
Drip-specific pressure reducers are compact inline devices designed for 16 mm or 1/2" hose connections. They are pre-set at fixed values (usually 1 bar or 1.5 bar) and install directly in the drip main line, downstream of the zone valve. Cost: €3–8 each. For vegetable gardens and flower beds, a drip reducer on every zone is a worthwhile investment.
Key takeaways
Measure your static pressure before designing any irrigation system — if it exceeds 5 bar, a pressure reducer is required. Install the reducer after the main filter, before the valve manifold. Use an adjustable model (€18–45) so you can tune pressure for each zone type. Set to 3–3.5 bar for spray systems, 3.5–4 bar for rotor systems, 1.5–2 bar for drip. A separate compact drip reducer on every drip zone prevents the most common drip system failure: emitters applying twice the intended water due to excess pressure.
Frequently asked questions
Do I need a pressure reducer if my tap pressure is only 3 bar?
Probably not for spray or rotor zones — 3 bar is within the ideal operating range. However, if you have drip irrigation, add a compact inline drip reducer set to 1.5 bar on the drip manifold — 3 bar is too high for most drip emitters.
Can a pressure reducer also fix water hammer?
Partially. Water hammer is a pressure spike caused by sudden valve closure. A reducer limits the static pressure level, which reduces the amplitude of hammer spikes. However, for serious hammer, a dedicated hammer arrestor (a small pressurised chamber installed near the valve manifold) is more effective.
The adjustment screw on my reducer turns but the outlet pressure does not change. What is wrong?
Most adjustable reducers have a locknut that must be loosened before the adjustment screw will move the diaphragm spring. Loosen the locknut (the outer ring on the adjustment cap), make the pressure change, then retighten the locknut to hold the setting.
Recommended products
These product links are affiliate links: if you buy on Amazon or AliExpress through them it costs you nothing extra, but it helps us keep SprinklerMap alive as a project and create new useful content.
| Product | Description | Price (€) | Buy |
|---|---|---|---|
| Watts 3/4" adjustable pressure reducer | Membrane-type 3/4" pressure reducer with replaceable cartridge. Adjustable 1.5–6 bar. Brass body with integrated strainer. Suitable for residential irrigation and mains protection. | ~€25-45 | Amazon |
| Hunter PRS40 pressure-regulated pop-up heads | Hunter pop-up heads with built-in pressure regulator (PRS series), factory-set to 2.8 bar. Eliminates the need for a central reducer on individual spray zones. Available in 10 and 15 cm riser heights. | ~€5-12 each | Amazon |
| Glycerine pressure gauge 0–10 bar | Glycerine-filled pressure gauge for stable readings during irrigation operation. 0–10 bar scale, 1/4" bottom entry. Essential for measuring actual line pressure before sizing a reducer. | ~€8-15 | Amazon |
| Drip filter + 2 bar reducer combo 3/4" | Combined Y-filter and 2 bar pressure reducer in one body, purpose-built for drip irrigation. Protects emitters and drip tape from excess pressure and clogging. Standard 3/4" connections. | ~€15-25 | Amazon |
| Product | Description | Price (€) | Buy |
|---|---|---|---|
| Adjustable pressure reducing valve, 1-6 bar | Threaded reducer with an adjustment collar: cuts the mains spikes that mist your spray heads and stress the fittings. | ~€10-25 | AliExpress |
| Water pressure gauge 0-10 bar, hose fitting | Digital or glycerine gauge with a garden thread: the minimum tool to measure pressure before sizing your zones. | ~€8-18 | AliExpress |
| Y filter 3/4", 120 mesh | Washable screen filter to fit upstream of any drip line: without it, emitters clog within a season. | ~€6-15 | AliExpress |
Technical note: The pressure, flow, coverage radius and cost figures in this article are indicative and calculated under standard conditions (2.5 bar, flat ground, short pipe runs). The actual outcome depends on the pressure available in your system, your meter's flow rate, head loss along the pipes and the specifications of the sprinklers you choose. For larger installations or complex situations, it's worth checking with a qualified technician or running the numbers on your own garden's real data.