How to measure water pressure for irrigation
Learn how to measure your home water pressure for irrigation with or without a gauge, minimum values for each sprinkler type, and how to calculate pipe pressure losses.

Why pressure is your starting parameter
Every pop-up sprinkler has a manufacturer-rated radius that only holds at a specific pressure, usually around 45 PSI (3 bar). A head rated for a 20 ft (6 m) throw at 45 PSI may reach only 14–15 ft (4–4.5 m) at 22 PSI (1.5 bar) — a 25–35% loss of coverage. Design from your real pressure, not the catalog number.
Skip this measurement and the whole layout rests on assumptions that rarely match reality. The classic symptom is an installed system that never quite covers the lawn, with dry stripes appearing in the spots farthest from each head.
Pressure also changes within a single property. The higher the garden sits relative to the water meter, the lower the pressure you get: every 10 ft (3 m) of elevation gain costs roughly 4.3 PSI (0.3 bar). A sloped backyard can read noticeably lower at the top than down by the house.
Typical residential pressure: what to expect
In the US, municipal supply usually runs 40–80 PSI (2.7–5.5 bar), with 45–60 PSI the most common range; older homes or houses on a hill can sit below 40 PSI. Across much of Europe, mains pressure is lower, around 2–4 bar (30–58 PSI).
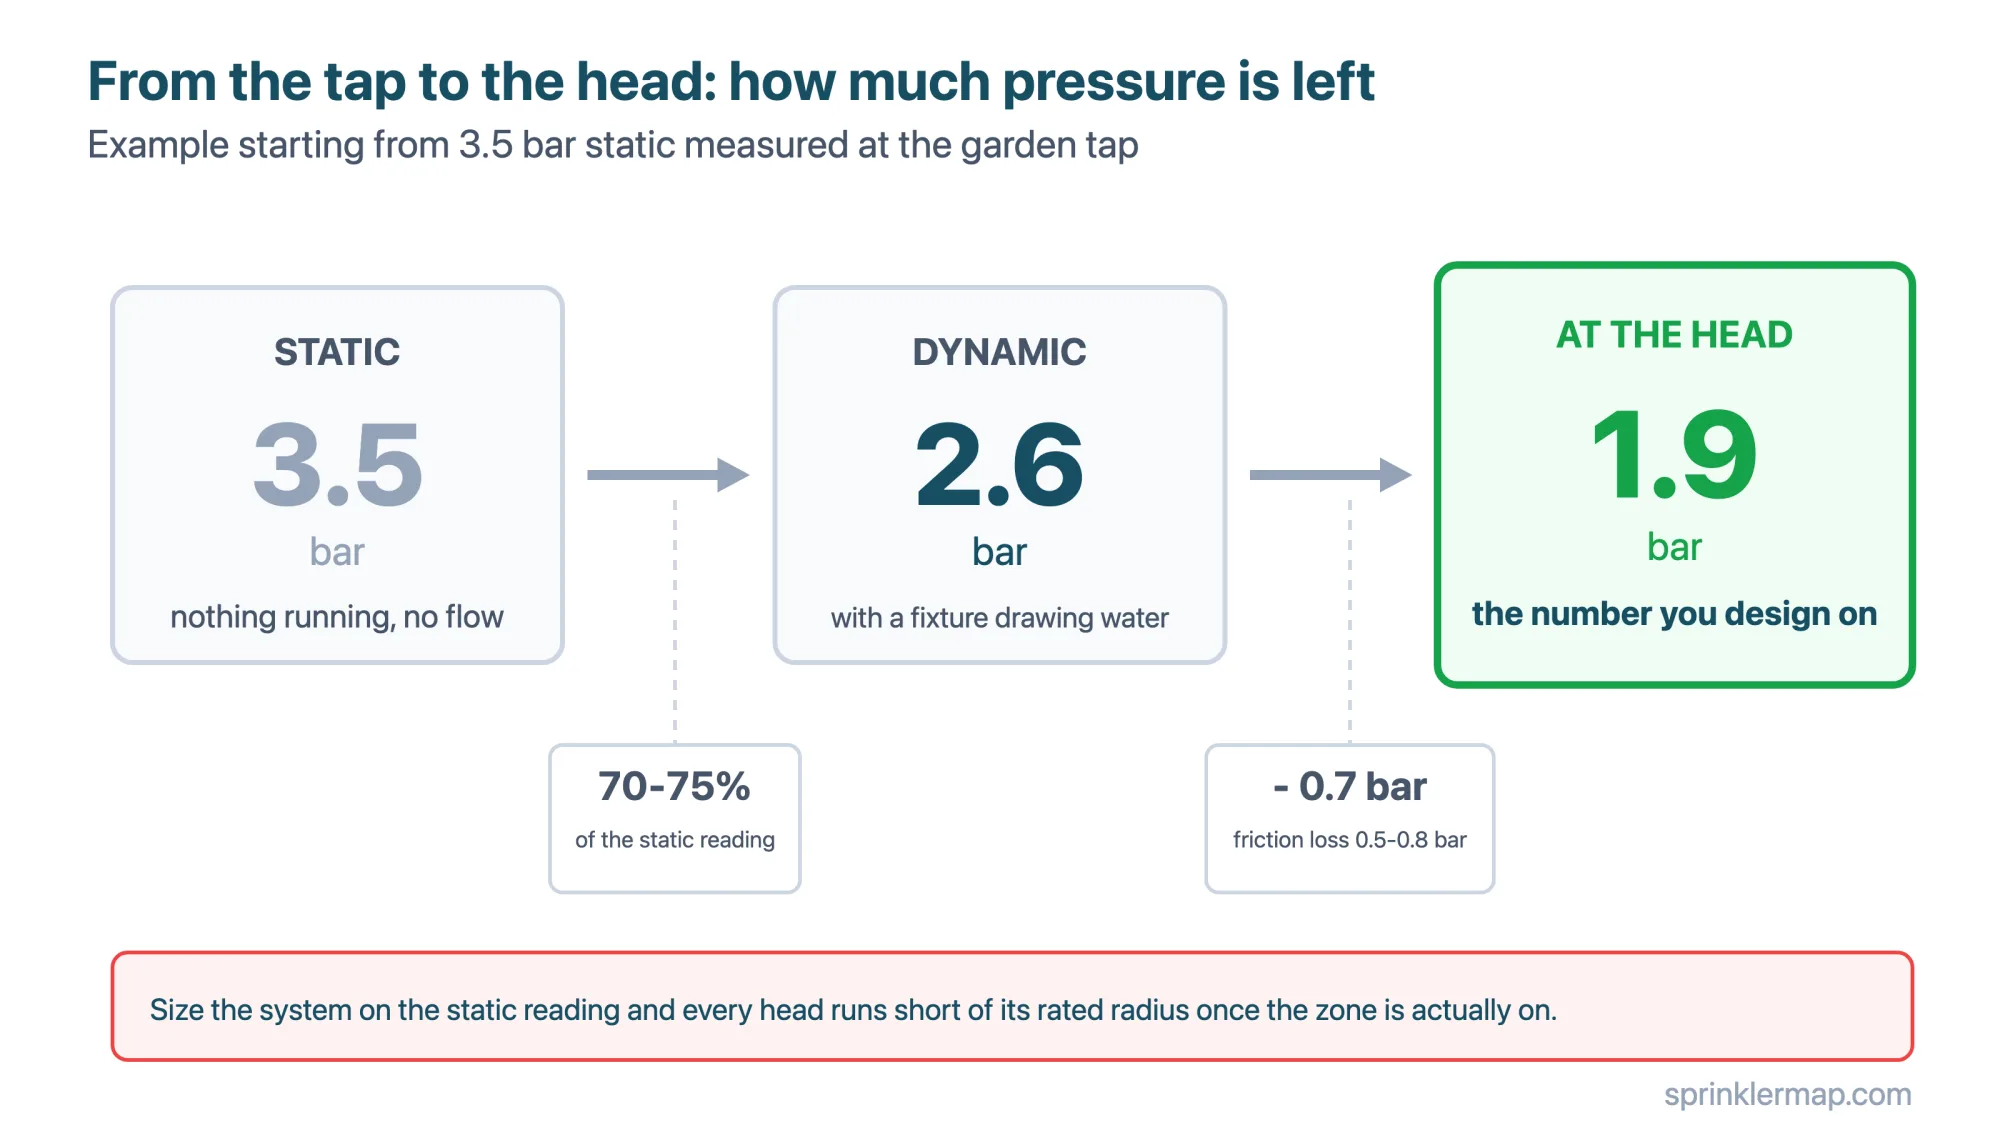
Always separate static pressure (every fixture closed) from dynamic pressure (water flowing somewhere else in the house). Size irrigation around dynamic pressure, because zones often run while a shower, dishwasher or washing machine is active. Dynamic pressure is typically 70–75% of the static reading.
If static pressure tops 65–80 PSI (4.5–5.5 bar), add a pressure reducer ahead of the irrigation manifold. Excess pressure shortens the life of heads and solenoid valves and causes misting — the fine fog that EPA WaterSense identifies as a major source of evaporation and wind-drift loss.
How to measure it: tools and procedure
The only tool you need is a hose-thread pressure gauge, about $8–15 at any hardware store. Thread it onto the outdoor spigot, open the valve slowly, and wait 5–10 seconds for the needle to settle. That reading is your static pressure.
For dynamic pressure, leave the gauge on and open an indoor fixture or start the washing machine, then read again. This lower number is the realistic value to design with.
Measure flow too, because pressure alone does not tell you how many heads can run at once. Remove the gauge, fill a 5-gallon bucket and time it: gallons divided by seconds, times 60, gives gallons per minute. Five gallons in 40 seconds is 5 ÷ 40 × 60 = 7.5 GPM (about 28 L/min). That flow ceiling sets your maximum heads per zone.
Be clear about what the bucket tells you: it measures flow, not pressure. Fill time depends both on pressure and on how much the spigot and hose choke the stream, so two homes at the same pressure can fill it at different speeds. Read as the indication it is, the shortcut is 300 divided by the seconds it takes to fill five gallons.
| Seconds per 5 gallons | Flow | What it means |
|---|---|---|
| 20 s | 15 GPM (~57 L/min) | very generous supply |
| 30 s | 10 GPM (~38 L/min) | good: carries an average zone |
| 40 s | 7.5 GPM (~28 L/min) | workable, keep zones small |
| 60 s | 5 GPM (~19 L/min) | tight: split into more, shorter zones |
| 90 s | 3.3 GPM (~13 L/min) | very tight: look for restrictions before designing |
Account for pressure losses along the pipe
Every component between the spigot and the farthest head bleeds off pressure: pipe length, 90° elbows, tees, the solenoid valve and the filter. These friction losses add up, and the last head on the circuit always sees the least.
As a working rule, budget 7–12 PSI (0.5–0.8 bar) of total loss across mainline, valve and fittings on a residential system, and design so heads still get their minimum after that. For tighter numbers: roughly 30 ft (10 m) of 3/4-inch poly at 2.6 GPM loses about 0.7–1.5 PSI; a 1-inch solenoid valve adds 1.5–3 PSI; a clean mesh filter adds another 0.7–1.5 PSI.
| Sprinkler type | Minimum pressure | Optimal pressure | Notes |
|---|---|---|---|
| Rotary pop-up (rotors) | 22–30 PSI (1.5–2 bar) | 35–45 PSI (2.5–3 bar) | Below the minimum the rotor stalls and dumps water in one spot |
| Fixed spray pop-up | 15–22 PSI (1–1.5 bar) | 30 PSI (2–2.5 bar) | Tolerant of low pressure, but not for radii beyond 10–13 ft |
| Drip emitters | 7 PSI (0.5 bar) | 7–22 PSI (0.5–1.5 bar) | Add a dedicated pressure regulator if mains exceed 30 PSI |
Minimum pressure by sprinkler type
Rotary pop-up rotors need at least 22–30 PSI (1.5–2 bar) and are happiest at 35–45 PSI. Below the minimum the rotation mechanism stalls and the head waters a single arc instead of sweeping back and forth.
Fixed spray pop-ups tolerate less, working from 15–22 PSI, but they are not the right pick for radii beyond 10–13 ft (3–4 m). Drip lines want only 7–22 PSI (0.5–1.5 bar) and usually need their own pressure regulator when the supply runs above 30 PSI, since high pressure blows out emitter accuracy and can pop fittings off the tubing.
Worked example
Say the spigot reads 58 PSI static and 44 PSI dynamic, with a measured flow of 9 GPM. Subtract roughly 10 PSI for mainline, valve and fittings, and the farthest rotor sees about 34 PSI — just inside the 35–45 PSI sweet spot, so catalog radii are realistic. The 9 GPM flow then caps how many heads share the zone: six 1.5 GPM rotors total 9 GPM, so that is the ceiling; split anything larger into a second zone.
Run the same numbers at 30 PSI dynamic and the picture changes. After losses the rotors fall to about 20 PSI, throws shrink, and you either switch to low-pressure nozzles, add a booster pump, or accept tighter head spacing. Measuring first is what turns these from on-site surprises into design decisions.
How to calculate available pressure per zone
The static pressure at the tap is not what reaches the sprinklers. Fittings, solenoid valves and pipe runs lose 0.5–0.8 bar along the way. Measure with a gauge at the garden tap (fully open), then subtract 0.7 bar as a conservative friction estimate. For how to measure pressure with or without a gauge see How to measure water pressure for irrigation.
If you measure 3 bar at the tap, design pressure at the sprinklers is roughly 2.3 bar. Use that figure to pick the right sprinkler type and size the radius. Keep in mind that pressure drops along the circuit — the head furthest from the valve gets less than the nearest one.
How many sprinklers per zone
The real limit is flow rate, not pressure. Each sprinkler consumes a certain number of litres per minute; the total for one zone must not exceed the available supply. A typical residential supply is 20–30 L/min.
A spray head uses 1–4 L/min depending on the arc it covers: the same 3 m nozzle puts out about 1 L/min on a 90° corner, 2 L/min on a half circle and nearly 4 L/min on a full circle. A 5 m rotor uses about 1.5 L/min. On a 25 L/min zone you can therefore run 6–10 spray heads, depending on how many are corners and how many full circles, or 10–12 rotors. For zone layout guidance see Hydrozones: split your garden to irrigate better.
Pressure reducer: when you need one
If static pressure exceeds 4 bar, install a pressure reducer before the system. Solenoid valves handle up to 8–10 bar, but constantly running at high pressure shortens nozzle life and increases leak risk at fittings.
An adjustable reducer lets you dial in the optimal working pressure for each sprinkler type. Mount it downstream of the meter, before the controller. The cost (€15–40) pays back within a few seasons of undamaged nozzles.
Quick reference table
Popup spray: 1.5–3 bar, from about 1.5 L/min (small nozzle, 90° arc) to 14 L/min (4.6 m nozzle, full circle) per head. Popup rotor: 1.7–4.5 bar, from about 1 to over 30 L/min depending on the nozzle, 4–15 L/min in most gardens. Micro-jets: 1–2.5 bar, 0.2–0.6 L/min. Drip: 0.5–2 bar (with dedicated reducer).
These values apply to mid-range products. Always check the datasheet for your specific model — Rain Bird, Hunter and Gardena all publish pressure/flow/radius curves free of charge on their websites.
| Sprinkler type | Working pressure | Flow per head |
|---|---|---|
| Pop-up sprays | 1.5–3 bar | 1.5–14 L/min |
| Pop-up rotors | 1.7–4.5 bar | 1–36 L/min by nozzle |
| Micro-sprays | 1–2.5 bar | 0.2–0.6 L/min |
| Drip (with dedicated reducer) | 0.5–2 bar | 2–8 L/h per emitter |
Balancing zones so pressure is even across the system
On a system with several zones fed from the same main valve, zones closer to the valve get slightly higher pressure than distant ones. On well-sized residential systems the difference is usually under 0.2 bar — negligible. The problem shows up with very long branches (over 30 m) run on undersized pipe (20 mm where 25 mm was needed).
To balance: use adequate pipe diameter for each zone's flow (see the friction table above), place solenoid valves near the connection point rather than at the far end of a run, and adjust individual zone flow with the regulating screw on the valve where available. If pressure differences are unavoidable given the garden's layout, compensate with run time instead: the lower-pressure zone needs a few extra minutes to deliver the same volume of water.
What to do if pressure is too low
If measured pressure at the tap is below 2 bar, pop-up spray heads will not cover their nominal radius and coverage will be patchy. Options in order of cost: install an inline pump booster (€150–300) to raise static pressure; switch to MP Rotators or drip emitters that operate at lower pressure; or redesign zones to use fewer sprinklers per zone (lower flow = lower friction losses = more pressure at the heads).
A partial fix that costs nothing: run zones during off-peak hours (very early morning, before 06:00) when mains pressure is typically 0.5–1 bar higher than during the day. In many urban areas, pressure is highest between midnight and 06:00.
Frequently asked questions
What pressure do I need for sprinklers?
Plan for 35–45 PSI at the head for rotors and about 30 PSI for fixed sprays; drip runs on 7–22 PSI with a regulator. Measure dynamic pressure at the spigot and subtract roughly 10 PSI of friction to estimate what the head will actually see.
Can I measure without a gauge?
Roughly, yes: time how long the outdoor tap takes to fill a 5-gallon bucket wide open to gauge flow, and watch sprinkler behavior — short, weak throws and stalled rotors signal low pressure. A $10 gauge is far more reliable and worth buying before you choose heads.
My pressure seems too high — is that a problem?
Above 65–80 PSI you will see misting, premature seal wear and blown fittings. A pressure-reducing valve set to 45–50 PSI for spray and rotor zones protects the system and cuts water lost to drift.
Recommended products
These product links are affiliate links: if you buy on Amazon or AliExpress through them it costs you nothing extra, but it helps us keep SprinklerMap alive as a project and create new useful content.
| Product | Description | Price (€) | Buy |
|---|---|---|---|
| Glycerine pressure gauge 0-6 bar with fitting | Glycerine-damped 0-6 bar pressure gauge with 1/2" male threaded fitting included. Precise reading without needle flutter. Essential for measuring real pressure before any irrigation project. | ~€12-25 | Amazon |
| Honeywell 3/4" pressure reducer | Honeywell D06F pressure reducer, 3/4 inch, outlet pressure adjustable 1.5-6 bar, max flow 3 m³/h. The professional standard for irrigation systems with excessive pressure. | ~€35-65 | Amazon |
| Universal 1" male gauge adapter | Brass 1" male adapter for connecting a pressure gauge to a garden tap or to the test points of a system. Fits standard 1/4" BSP gauges. | ~€5-12 | Amazon |
| Digital 1/2" flow meter | Digital 1/2 inch flow meter with display, 1-30 L/min range. Screws onto the tap to measure the maximum flow available. Essential alongside pressure for correct sizing. | ~€15-35 | Amazon |
| Product | Description | Price (€) | Buy |
|---|---|---|---|
| Water pressure gauge 0-10 bar, hose fitting | Digital or glycerine gauge with a garden thread: the minimum tool to measure pressure before sizing your zones. | ~€8-18 | AliExpress |
| Adjustable pressure reducing valve, 1-6 bar | Threaded reducer with an adjustment collar: cuts the mains spikes that mist your spray heads and stress the fittings. | ~€10-25 | AliExpress |
| Digital hose flow meter | Litres-per-minute meter that screws onto the tap: measures the flow you actually have, the number that decides how many heads fit in a zone. | ~€10-25 | AliExpress |
Technical note: The pressure, flow, coverage radius and cost figures in this article are indicative and calculated under standard conditions (2.5 bar, flat ground, short pipe runs). The actual outcome depends on the pressure available in your system, your meter's flow rate, head loss along the pipes and the specifications of the sprinklers you choose. For larger installations or complex situations, it's worth checking with a qualified technician or running the numbers on your own garden's real data.