How to design irrigation for a rectangular garden
A complete case study built in SprinklerMap: a 10×8 m garden designed step by step — survey, 4 rotors, wetting simulation, 89.5% coverage and a real parts list from €313 to €539.
The case study: a real 80 m² design, number by number
This article is different from the usual theory guides: the garden in the screenshots is a real project, drawn in SprinklerMap, and every number you will read — coverage, metres of pipe, watering minutes, prices — is what the app calculated on that design, not a convenient estimate. The case is the most common residential layout there is: a 10 × 8 metre rectangle, 80 m² of lawn in full sun, with no pools, trees or beds breaking the geometry.
The project settings are those of a typical household supply: 2.5 bar dynamic pressure, 15 L/min available flow, loam soil. The end result, built step by step below: 4 pop-up rotors in the corners, 34.6 m of polyethylene pipe, 89.5% coverage and a complete parts list between €313 and €539. If your garden is bigger or shaped differently, the last section gives you the rules to adapt every step.
Step 1 — Measure and draw to scale
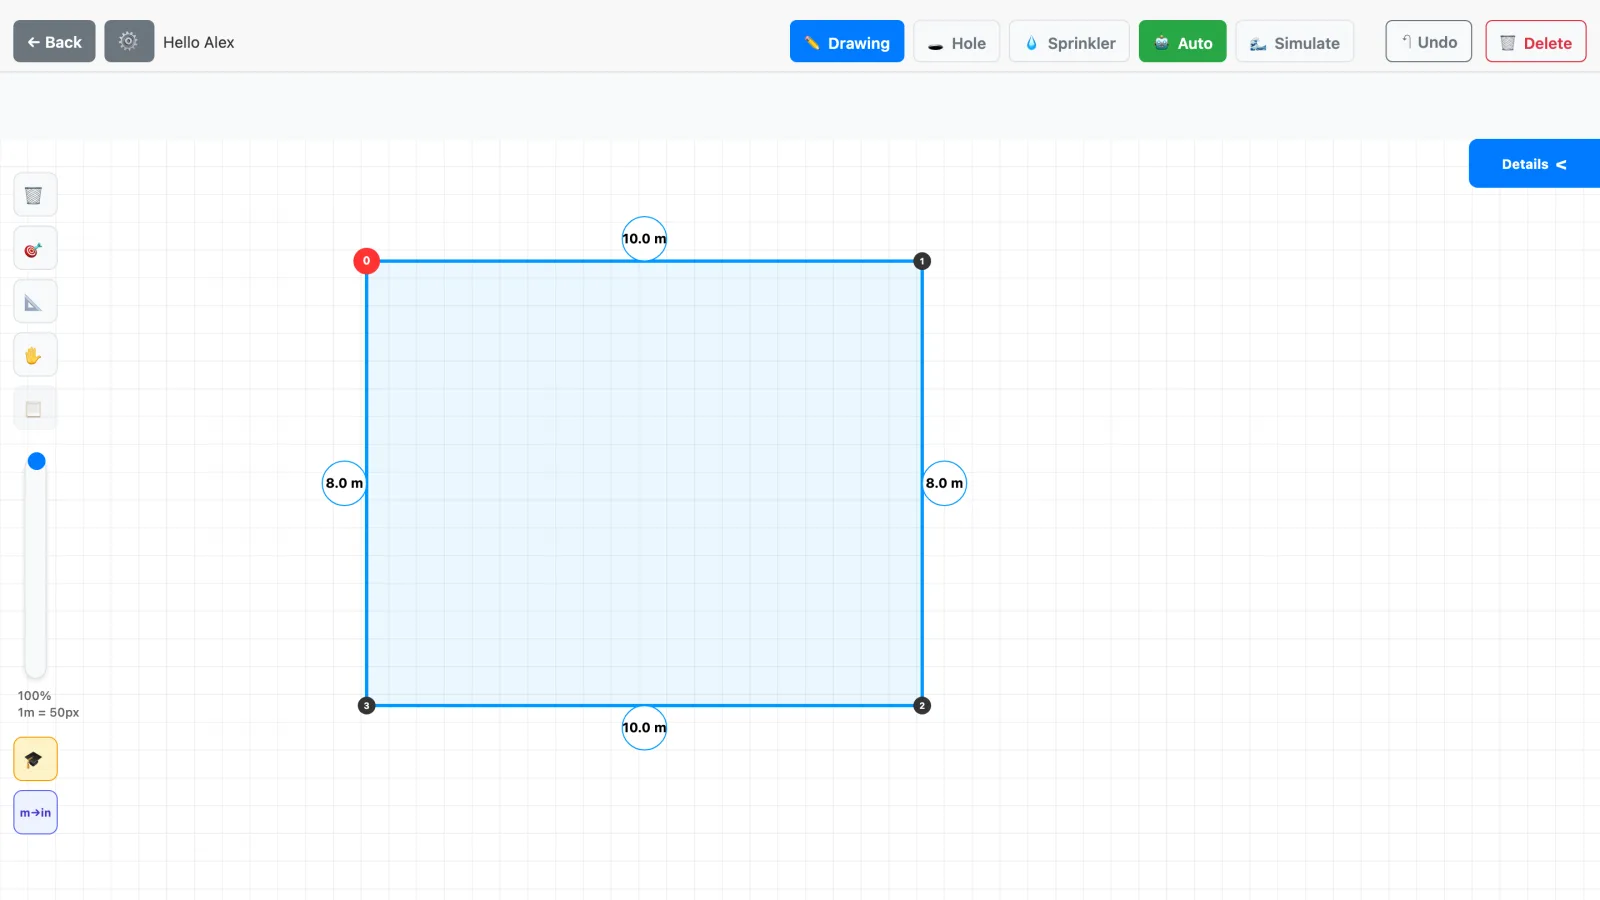
Everything starts with two measurements taken with a tape measure or laser meter: 10.0 m on the long side, 8.0 m on the short one. It sounds trivial, but precision here counts double, because every survey error propagates into sprinkler radius, pipe length and the final quote. Measure both opposite sides, not just one: in real "rectangular" gardens they often differ by 20-30 cm, and in that case you should draw the actual trapezoid, not the ideal rectangle.
In the drawing canvas the scale is fixed and stated — at 100% zoom one metre is 50 pixels — and the app shows each edge length live as you place the vertices: the rectangle in the screenshot closes at exactly 10.0 × 8.0 m, that is 80.0 m². If you would rather start from your garden's true boundaries instead of a free drawing, you can trace them directly on the satellite map with GPS: the full procedure is in How to map irrigation zones in your garden.
Step 2 — Auto placement: 4 corner rotors at 90°
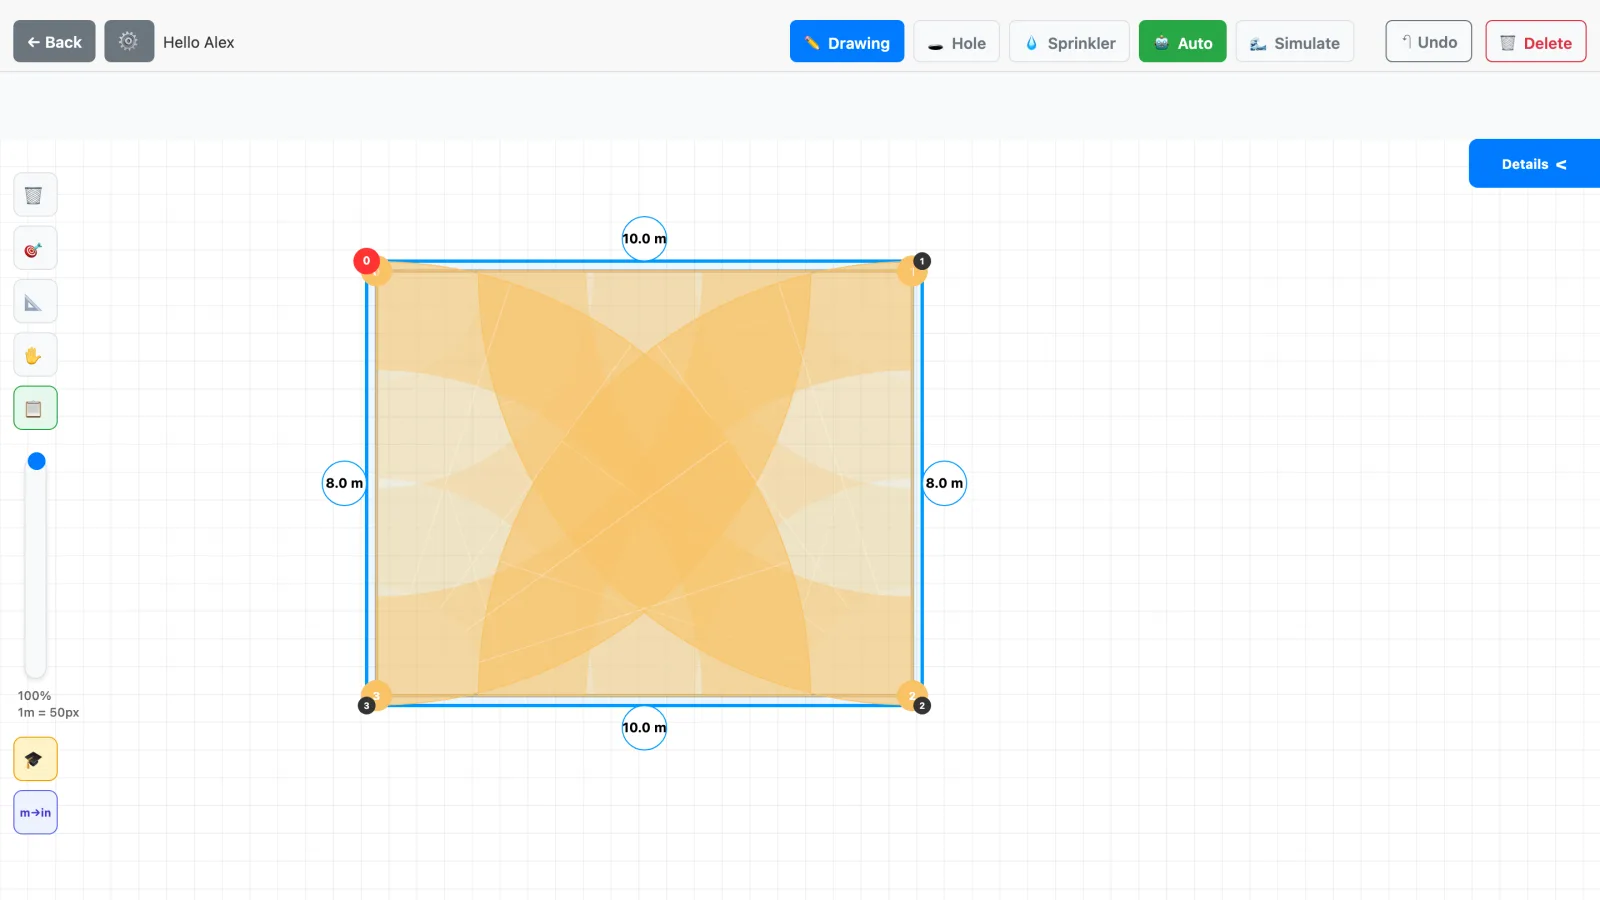
With the perimeter closed, the Auto button generates the layout. The perimeter-priority algorithm applies a rule professional installers take for granted and beginners almost always ignore: sprinklers go in the corners and along the edges with reduced arcs — 90° in a corner, 180° at mid-side — never in the middle of the lawn spraying outwards onto walls and pavements. On our rectangle the result is 4 rotors in the corners, each with a 90° arc and a 7.8 m working radius.
That radius is no accident: 7.8 m on 8 and 10 m sides means each rotor almost reaches the heads of its two neighbours — the head-to-head principle behind uniform coverage, explained in detail in Sprinkler Head Spacing: The One Decision That Decides Whether Your Lawn Goes Brown. The overlapping arcs you see in the screenshot are not waste: a jet always delivers less water towards the end of its throw, and overlapping two decaying jets is the only way to get uniform precipitation in the middle band.
Step 3 — The simulation: find the weak spots before you dig
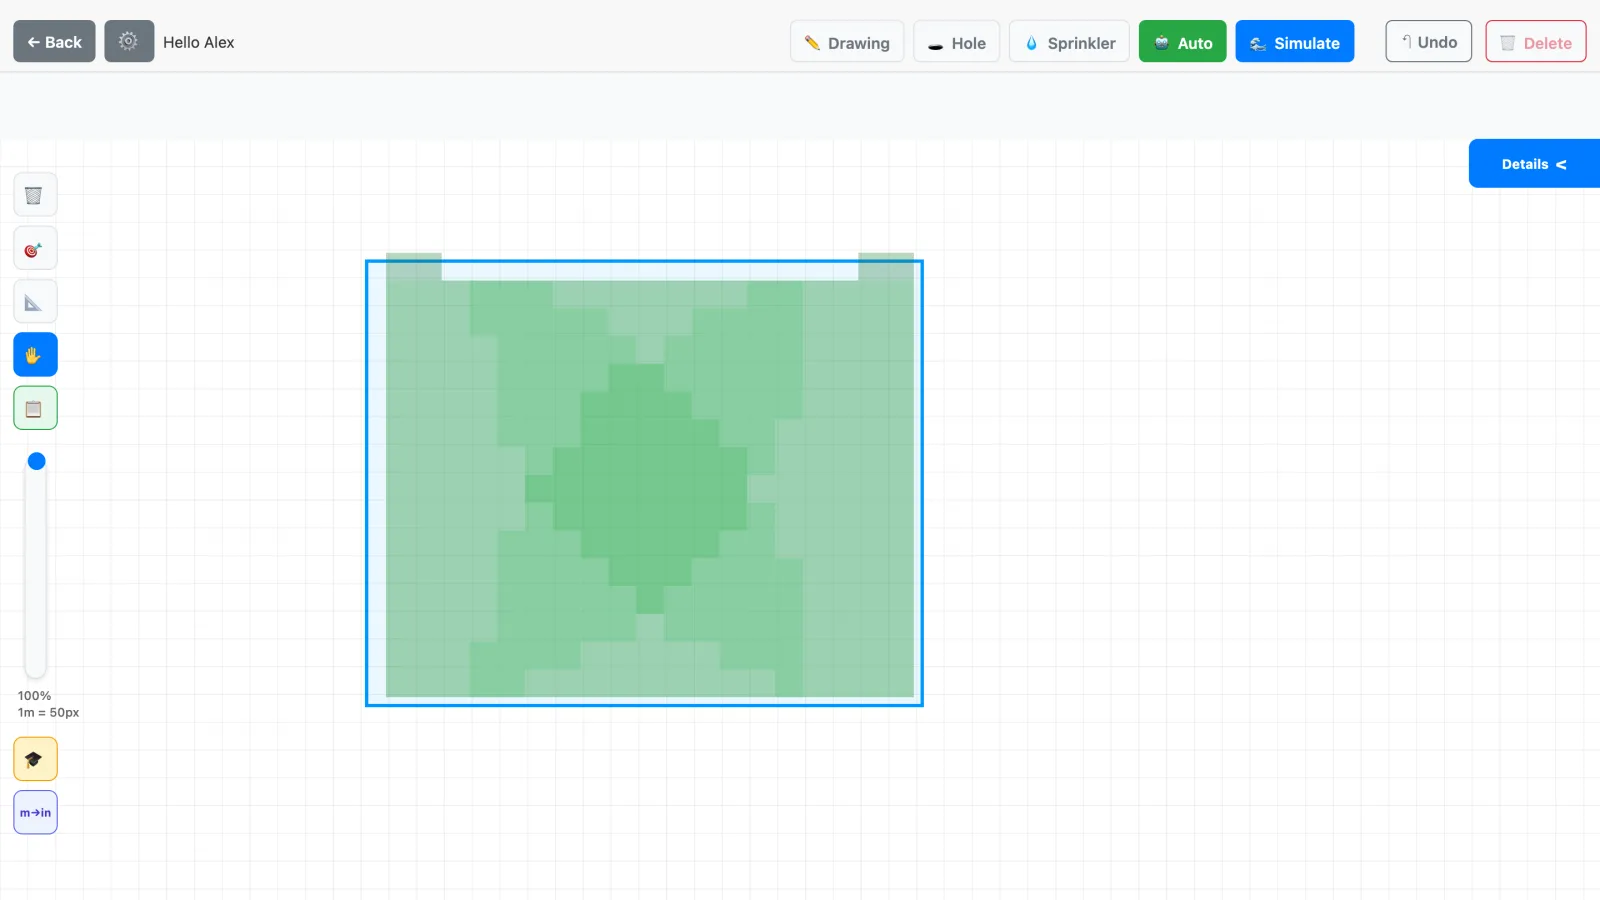
Before buying anything, the simulation colours the lawn with the water it would actually receive: dark green where jets add up, light green where a single jet lands. On our project the map shows the classic four-sector pattern: the centre and diagonals get more, the mid-side bands stay lighter but covered.
On paper this step simply does not exist, and it is the concrete advantage of designing in software: if the simulation shows a dry zone — it happens on more elongated rectangles, above 12-13 m — fixing it now costs one click (an extra rotor at mid-side), while fixing it after installation costs a reopened trench. After the install, the ground-truth check on the real lawn takes six cups and ten minutes: the method is in The catch-cup test: measure sprinkler uniformity and your real inches per hour.
Step 4 — The project numbers: 89.5% coverage, 33 minutes a day
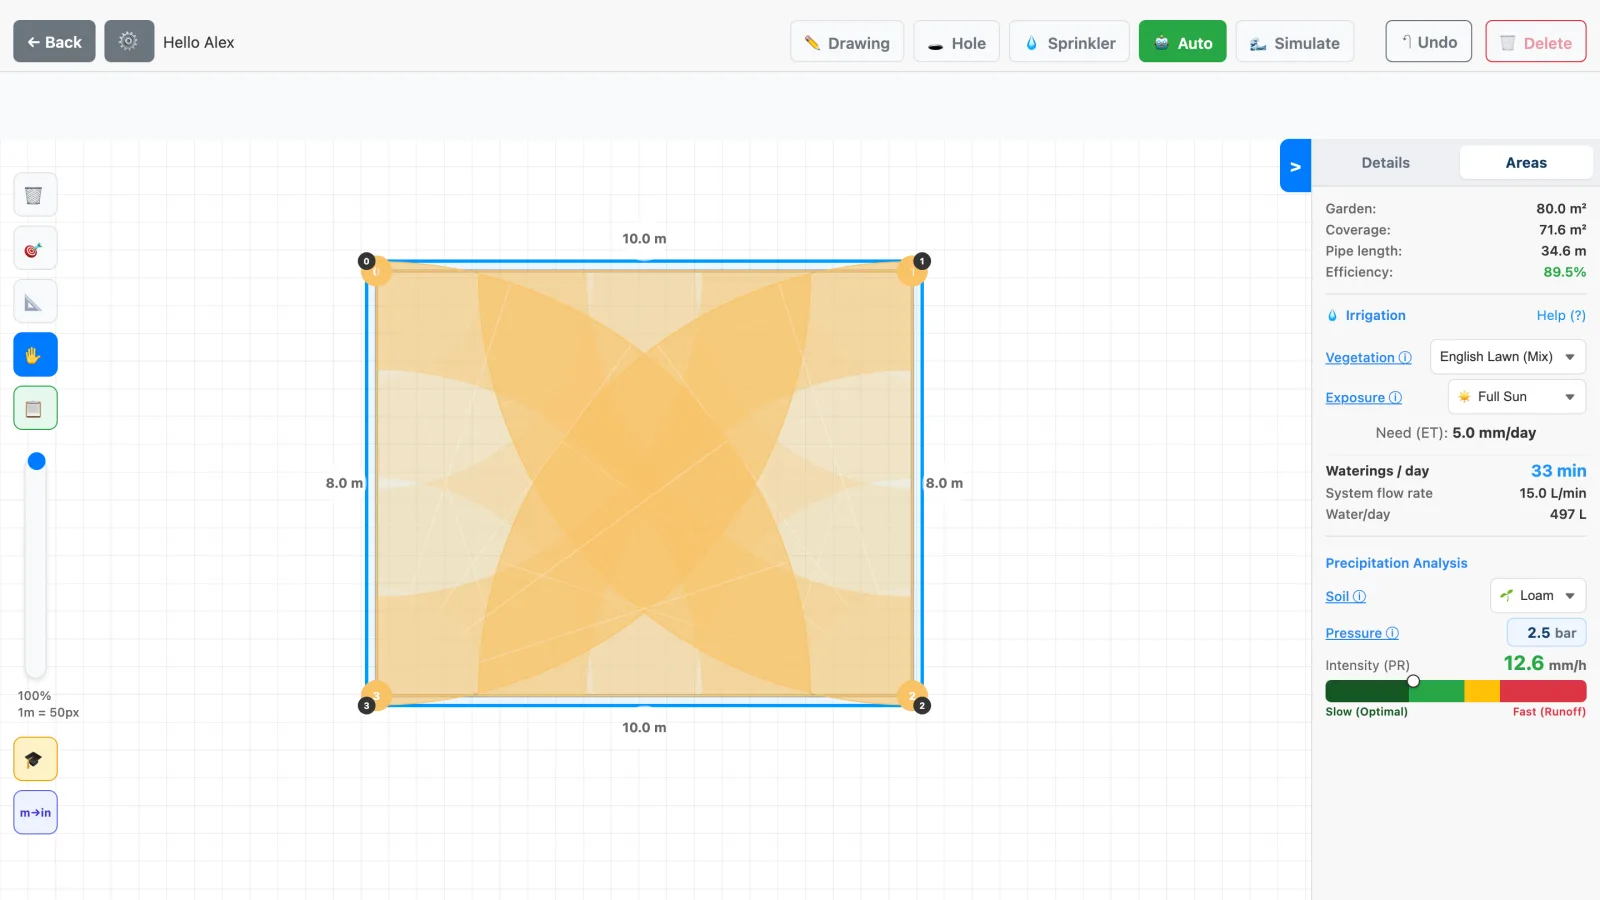
The Areas panel sums the project up in four measured lines: 80.0 m² of garden, 71.6 m² covered, 89.5% efficiency, 34.6 m of pipe. The uncovered 10% is the thin band along the edges at mid-side, where the corner jets arrive at the limit of their throw. If you want to get close to 100% you can move to 6 sprinklers — 4 corners at 90° plus 2 at the middle of the long sides at 180° — for an extra €60-90: that is the right call above 12 m of side length, while on 80 m² nearly 90% with 4 rotors is the compromise almost any installer would recommend.
The irrigation section computes the water need with the evapotranspiration method: for a lawn in full sun the peak ET is 5.0 mm per day, which on 80 m² becomes 497 litres and — at the system flow rate of 15 L/min — 33 minutes of watering per day at the height of summer. It is not a preset table value: change vegetation, exposure or soil in the panel and times and litres are recalculated for your case. Why ET is the correct basis for this calculation is explained in Why Evapotranspiration Is the Foundation of Modern Irrigation: the FAO-56 Paper Explained.
The precipitation analysis closes the loop: the 4 rotors deliver 12.6 mm/h, below the infiltration rate of loam soil, and indeed the app's indicator stays in the green "slow, optimal" band. On clay the same layout would land near the runoff zone: in that case the 33 minutes should be split into 2-3 cycles an hour apart (cycle and soak). The correct run times for each soil type are in How long to run sprinklers: minutes per cycle by soil and head type, with the math behind them.
Step 5 — The generated parts list: €313 to €539
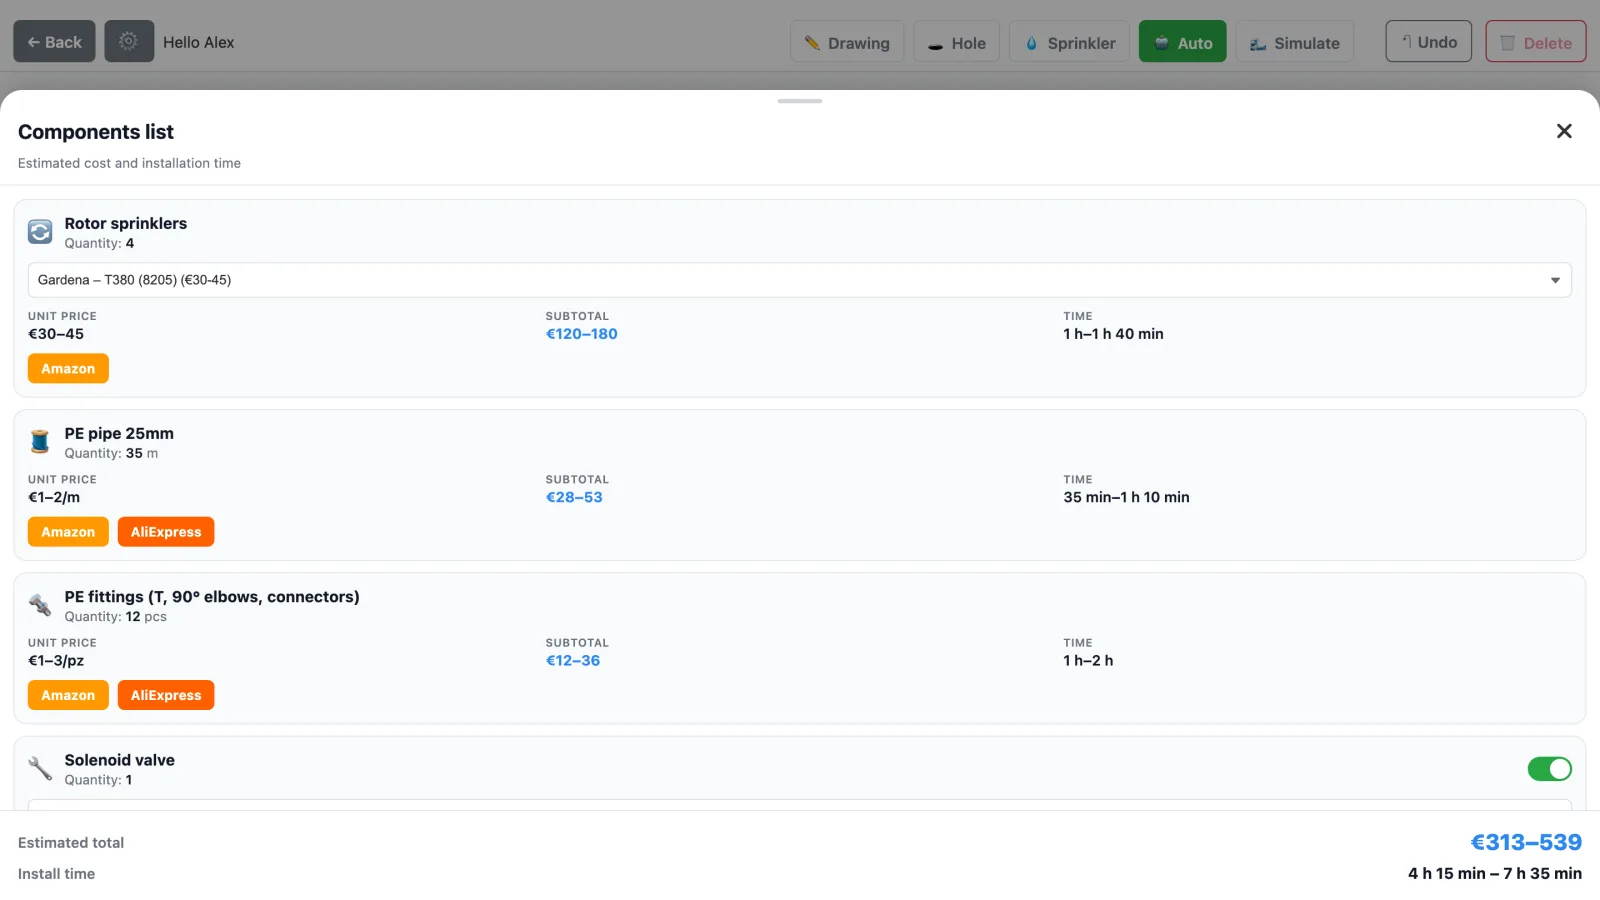
The parts list is generated from the drawing, not from generic formulas: 4 rotors because that is what the algorithm placed, 35 m of pipe because the route measured on the project is 34.6 m rounded to the cut, 12 fittings counted on the actual network nodes. For every line the app offers alternative models with their price — from Hunter PGP Ultra rotors at €12-26 to the Gardena T380 at €30-45 — and it is almost entirely this choice that moves the total from the bottom to the top of the range.
The two optional-but-recommended lines, rain sensor and soil moisture sensor (€90-140 together), are precisely the ones that pay for themselves within a season by skipping pointless waterings: how they work is in Rain sensor for irrigation: legal requirement and how it works. And note the time estimate — between 4 h 15 min and 7 h 35 min for 80 m², digging included — meaning one relaxed weekend for two people. The comparison between this DIY build and turnkey quotes for the same size is in How much does a sprinkler system cost? Parts, installer quotes, backflow, and the water bill nobody budgets.
| Component | Quantity | Price | Est. install time |
|---|---|---|---|
| Pop-up rotors (Gardena T380; alternatives Hunter PGP Ultra, Rain Bird 5000) | 4 | €120–180 | 1 h – 1 h 40 min |
| 25 mm PE pipe | 35 m | €28–53 | 35 min – 1 h 10 min |
| PE fittings (tees, 90° elbows) | 12 pcs | €12–36 | 1 h – 2 h |
| Solenoid valve | 1 | €15–30 | 30 – 45 min |
| Controller / timer | 1 | €30–55 | 30 min – 1 h |
| Rain sensor | 1 | €60–90 | 20 – 30 min |
| Soil moisture sensor | 1 | €30–50 | 20 – 30 min |
| Lawn seed (trench repair) | 2.4 kg | €18–45 | — |
| Total | — | €313–539 | 4 h 15 min – 7 h 35 min |
Adapting the method to your own rectangle
Change the size and the layout changes, not the method. The rules this case study makes concrete: up to about 9-10 m of side length, 4 corner sprinklers with a radius equal to the short side are enough; above 12 m of long side, add a 180° sprinkler at mid-side every 7-8 m; as a rough density, count one sprinkler every 12-14 m² with 4-5 m radius sprays, far fewer with rotors. And the usable radius depends on your real pressure, not the one on the box: measure it with the gauge method described in How to measure water pressure for irrigation before choosing models.
The second constraint is flow: our project fits in a single zone because the 4 rotors together stop exactly at the 15 L/min available. The check for your case is always the same: measure your real flow with a bucket and a stopwatch, keep 80% of it as margin, divide by the unit flow of your chosen sprinklers; if the total does not fit, the system splits into several zones with one solenoid valve each. And if there are beds or hedges besides the lawn, they belong on a separate drip zone anyway: the reason is in Hydrozones: split your garden to irrigate better.
On pipe routing, two site-proven tips: on a rectangle the most robust line is the closed perimeter loop, which balances pressure from both sides; and every sprinkler should hang off its tee on a 30-40 cm flexible swing pipe, never rigid — it absorbs ground movement and lets you adjust head height after backfilling. Buy 10% extra fittings as spares. Then open the editor and draw your own rectangle: this article's project, from sketch to parts list, took less than ten minutes.
Frequently asked questions
Why does the auto-placement algorithm put sprinklers in the corners instead of the middle of the lawn?
Because sprinklers in the middle spray outward onto walls and pavement. The perimeter-priority rule — corners at 90°, mid-side at 180° — is what professional installers take for granted: on the case study's 10×8 m rectangle it produced 4 corner rotors with a 7.8 m radius and 89.5% coverage.
Why doesn't the 80 m² project reach 100% coverage?
The uncovered 10% is a thin band along the edges at mid-side, where the corner jets reach the limit of their throw. Moving to 6 sprinklers (adding 2 at mid-side, roughly €60-90 extra) closes that gap — worth it above 12 m of side length, while under that, 90% coverage with 4 rotors is the compromise most installers would recommend.
What actually decides whether the project needs one zone or several?
Available flow, not garden size. The case study's 4 rotors together use exactly the 15 L/min available — right at the limit with no margin. If the layout needed more heads than the tap can support, the fix is splitting into additional zones with their own solenoid valve, not adding pressure.
How is the 33-minutes-a-day watering time calculated?
From evapotranspiration, not a preset table: a full-sun lawn's peak ET of 5.0 mm/day on 80 m² works out to 497 litres, which at the system's 15 L/min flow rate takes 33 minutes. Change the vegetation, exposure or soil and the app recalculates both figures for that specific case.
Recommended products
These product links are affiliate links: if you buy on Amazon or AliExpress through them it costs you nothing extra, but it helps us keep SprinklerMap alive as a project and create new useful content.
These products are catalogued in our brand database, with the same description and price range you find on the manufacturer page.

| Model | Type | Description | Radius (m) | Price (€) | Buy |
|---|---|---|---|---|---|
| 🔄 I-20 | Rotor | Professional rotor with anti-theft retractable bolt. High flow rate for large gardens. Arc 40°–360°. | 4.9–14 m | €22-40 | Amazon |
| 🔧 PGV-101 | Valve | 1" residential solenoid valve. Female thread, manual override, ideal for single zones. | — | €22-42 | Amazon |

| Model | Type | Description | Radius (m) | Price (€) | Buy |
|---|---|---|---|---|---|
| 🖥️ ESP-RZXe (4-8 zone) | Controller | Easy-to-use indoor controller, 4-8 zones. 230 V power, optional LNK Wi-Fi module. | — | €85-160 | Amazon |
Other suggested products
Products not in the brand catalogue: generic material, tools and accessories where the right size matters more than the brand.
| Product | Description | Price (€) | Buy |
|---|---|---|---|
| PE pipe 32 mm for buried irrigation | High-density polyethylene pipe DN 32 mm PN6, 25 m coil. For high-flow main lines in gardens above 200 m². Flexible, frost-resistant, suitable for burial. | ~€30-55 | Amazon |
| Rain Bird 6-zone controller | Rain Bird ESP-TM2 6-zone controller, 24V AC supply. Backlit display, 3 independent programs, rain sensor input. The standard for residential systems with 4-6 zones. | ~€50-90 | Amazon |
| Hunter PGV 1" solenoid valve | Hunter PGV 1" solenoid valve with flow control and manual bleed. Noryl diaphragm, 1-10 bar pressure, max flow 55 L/min. Among the most reliable valves for residential systems. | ~€20-35 | Amazon |
| Product | Description | Price (€) | Buy |
|---|---|---|---|
| Adjustable-arc pop-up rotors | Gear-drive rotors with adjustable arc for medium lawns. Compare stated throw and flow against your zone before ordering: they vary a lot. | ~€15-40 | AliExpress |
| Irrigation solenoid valve 3/4"-1", 24V AC | Solenoid valve compatible with standard 24V controllers. Good as a spare: check the thread and whether flow control is included. | ~€8-20 | AliExpress |
Technical note: The numbers in this case study (coverage, pipe metres, times, litres and prices) were calculated by SprinklerMap on the project shown in the screenshots, with the stated settings (2.5 bar, 15 L/min, loam soil, 5.0 mm/day ET) and indicative August 2026 price lists. With different pressure, flow or soil the results can change substantially: redo the calculation for free on your own garden's drawing in the app before buying materials.