How to bury irrigation pipes: depth and techniques
Practical guide to burying irrigation pipes: correct depth, which pipe to use, how to open trenches in established lawn and how to protect crossings under paths.

Tools you need before you start
Good preparation makes the difference between a satisfying weekend project and a three-week ordeal. Essential tools: a flat spade or electric edger for opening lawn slots, a PE pipe cutter or fine-tooth hacksaw for clean cuts, a compression fitting spanner (or adjustable wrench), a spirit level for checking slope, a 30 m tape measure, and a pressure gauge for testing before backfilling.
For gardens over 200 m², a narrow-blade electric trencher (rentable from most hire shops for €80–120/day) reduces trench-opening time from two days to two hours. A mallet and a 20 mm sharpened steel rod are essential for pushing pipe under paths without excavation.
Minimum and maximum depth
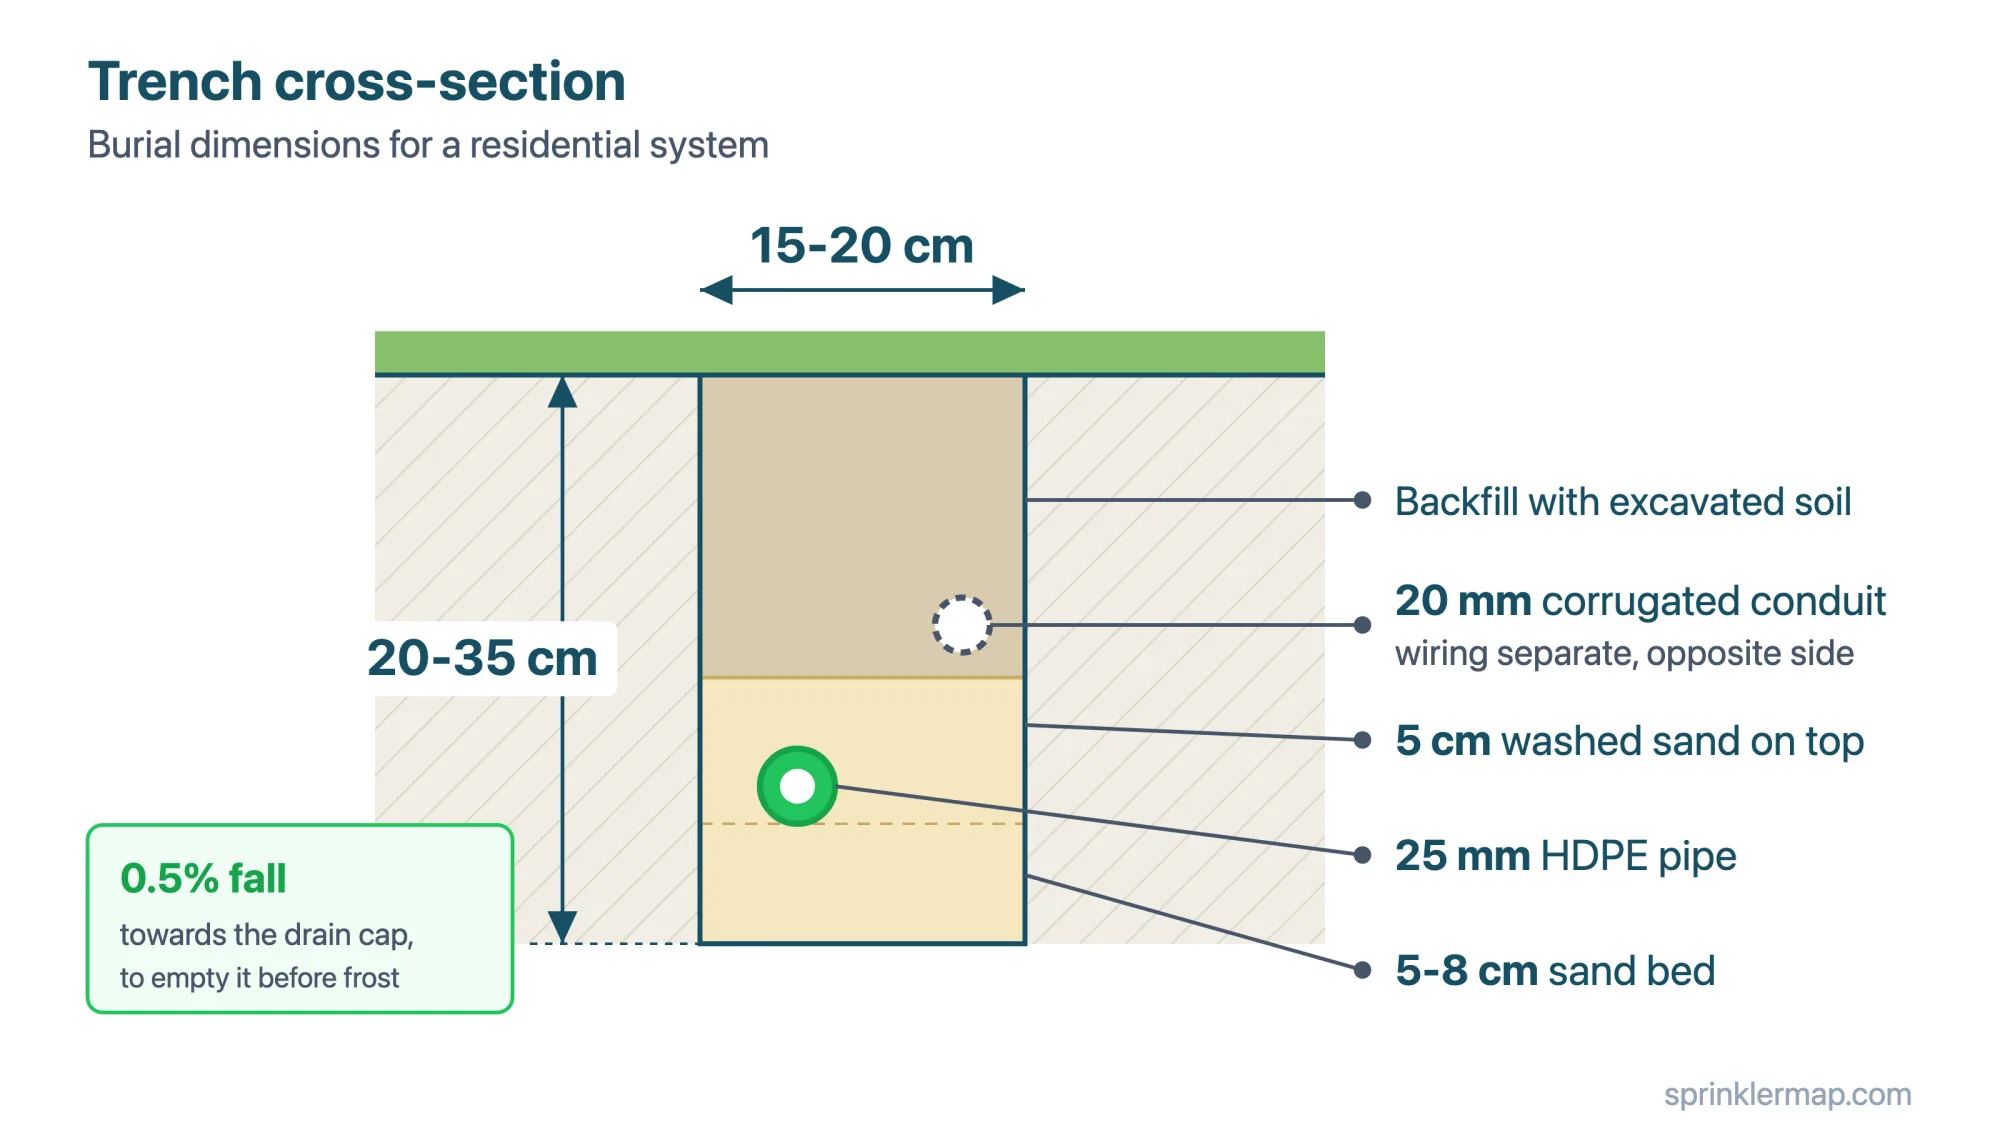
Minimum burial depth: 20 cm. Below this threshold, mowers and garden forks can dislodge fittings, and grass roots invade push-fit joints over time. In frost-prone areas (average winter temperatures below −5 °C), take main lines to at least 30–35 cm — below the frost line for most of northern Europe.
Maximum practical depth: 40–45 cm for garden irrigation. Beyond that, excavation becomes laborious with no meaningful benefit. Exception: pipes crossing vehicle traffic areas — go to 50–60 cm and sleeve the pipe through a larger protective conduit. Any vehicle crossing without a sleeve, regardless of depth, risks crushing the pipe under repeated loading.
Opening trenches in established lawn
The cleanest method for established lawn is a narrow cut with an electric edger or half-moon spade: open a 5–6 cm slot, just wide enough for the pipe. The grass roots on either side remain largely undamaged; the lawn closes back with almost no visible trace within 2–3 weeks if you keep the repair watered.
For wider trenches (needed for 32 mm main lines), cut and set aside 30 cm sod sections — whole turves with the root mat intact. After backfilling and tamping, replace the sods and press them down firmly. With regular watering the turf heals in 10–15 days. Do not let removed turf dry out while you work; stack it grass-down in the shade.
Which pipe to use underground
Use high-density polyethylene (HDPE), PN6 or PN10. Main line: 25 mm. Branch lines: 20 mm. HDPE is flexible enough to lay in curved trenches, frost-resistant down to −40 °C, immune to soil chemicals and root acids, and rated for over 30 years buried.
Avoid rigid grey PVC: it becomes brittle at low temperatures and cracks when soil freezes and expands around it. Avoid low-density agricultural PE pipe (the soft blue or black irrigation tubing sold at agricultural suppliers): it deforms under sustained pressure above 2 bar and is not rated for domestic supply.
Crossings under paths and paved areas
Do not excavate under a path — push through. Sharpen a 20 mm steel rod and drive it through the soil under the path with a mallet, then pull it back and feed the HDPE pipe behind it. The technique works on compacted gravel or clay up to about 2 m width. On wider crossings or compacted hardcore, hire a mole plough.
Always sleeve the crossing: cut a larger-diameter conduit (40 mm HDPE) slightly longer than the crossing width and push that through first, then feed the irrigation pipe through the sleeve. This lets you withdraw and replace the pipe in future without breaking up the paving again — a ten-minute repair instead of a full demolition job.
Pressure test before backfilling
Always pressure-test the system before closing the trenches. Connect a hand pump with a pressure gauge to the inlet, close all zone valves, and pressurise to 1.5× the working pressure (typically 5–6 bar for a 3–4 bar supply). Hold for 15 minutes. Any compression fitting not tightened correctly will show as a visible drip — easy to fix now, expensive to find after the trench is closed.
Mark the location of any fitting you re-tighten and photograph it again. A fitting adjusted under test pressure is sometimes slightly looser once pressure normalises — recheck after 5 minutes at working pressure before backfilling that section.
Map the system before backfilling
Before covering trenches, photograph everything: overhead shots every 3–5 m documenting pipe routing and every fitting location. Store the photos with the date in a folder titled with the installation year. In five years you will know exactly where to dig without risking cutting through an existing line.
Better still, note distances from walls or fixed boundaries on a rough sketch. A phone photo of the sketch stored alongside the trench photos is enough. Fifteen minutes of documentation now saves hours of exploratory digging later — and prevents the expensive scenario of cutting through an unmarked pipe with a power auger.
Key takeaways
Bury the main line at 25–30 cm minimum, more in frost zones. Use HDPE PN6 or PN10 — never grey rigid PVC. For crossings under paths, push through rather than excavate. Pressure-test at 1.5× working pressure before backfilling. Photograph every fitting and every run with distances from fixed reference points. These five rules prevent the most common and most expensive irrigation failures.
Frequently asked questions
Can I bury the pipe shallower to save effort?
Anything above 20 cm is a gamble. A single pass with a scarifier on an established lawn reaches 8–12 cm. A garden fork thrust in at the wrong angle reaches 15–18 cm. Save the time and dig to the correct depth the first time.
Do I need to slope the pipe downhill for drainage?
Not for a pressurised system — pressure keeps water moving in any direction. However, fitting drain valves at the lowest point of each zone lets you empty the system for winter without compressed air.
How do I repair a buried pipe cracked by frost?
Cut out the damaged section with 5 cm clearance each side of the crack and join with two compression couplers and a short replacement length. If frost caused the failure, increase burial depth on the replacement section.
Recommended products
These product links are affiliate links: if you buy on Amazon or AliExpress through them it costs you nothing extra, but it helps us keep SprinklerMap alive as a project and create new useful content.
| Product | Description | Price (€) | Buy |
|---|---|---|---|
| PE pipe 32 mm coil for irrigation | High-density polyethylene pipe DN 32 mm PN6, 25 m coil. Flexible, frost-resistant, ideal for buried main lines in garden systems. | ~€25-45 | Amazon |
| Compression fittings for buried irrigation | Set of quick compression fittings in reinforced polypropylene for PE irrigation pipe. Tees, elbows, reducers and end caps. Tool-free assembly, sealed up to 8 bar. | ~€15-30 | Amazon |
| Fine washed sand for pipe bedding | Fine-grade washed sand to protect buried pipework from stones and roots. 25 kg bags, ideal for the bedding layer and for covering irrigation pipes. | ~€8-15 | Amazon |
| Pipe cutter for PE polyethylene pipe | Ratchet pipe shears for clean, perfectly square cuts on PE pipe from 16 to 42 mm. Essential for leak-free fittings: a clean cut avoids the burrs that cause leaks. | ~€10-20 | Amazon |
| Product | Description | Price (€) | Buy |
|---|---|---|---|
| PE compression fitting kit, 16-25 mm | Assorted elbows, tees, couplers and end caps for PE pipe. Handy as a spares box: fittings always break on a Sunday. | ~€10-30 | AliExpress |
| PE/PVC pipe cutter | Ratchet cutter for clean, square cuts on pipe. A skewed cut is the number one cause of leaks at compression fittings. | ~€6-15 | AliExpress |
Technical note: The depths, spacings and practices described in this article are general guidance based on standard soil and climate conditions. Minimum burial depth, for example, depends on the frost line in your area and on local regulations: always check your own soil conditions and, for structural work, your local building rules before you dig.