How SprinklerMap places sprinklers automatically
One garden, three algorithms, three different layouts. What each one optimises, the arrangement it produces and when to pick it — with screenshots from the same real case.
SprinklerMap Team · 16 agosto 2026
The problem automatic placement has to solve
Arranging sprinklers in a garden has no single right answer. The requirements pull in opposite directions:
- Cover the whole surface: every square metre of lawn must get water from at least one sprinkler, otherwise a dry patch is left behind.
- Overlap the throws: the head-to-head principle requires the distance between neighbouring sprinklers never to exceed the radius, because a sprinkler delivers far less water at the end of its throw than close to the head.
- Keep water inside: water on paths, walls and fences is wasted water and damaged surfaces.
- Use few sprinklers: every extra head is a cost, another trench and a share of flow taken away from the circuit.
No single arrangement maximises all of them at once: more overlap means more heads, fewer heads open coverage gaps. That is why SprinklerMap does not offer one automatic layout but three strategies, each giving priority to a different goal.
This page describes what each algorithm optimises and what layout it produces, not how it gets there internally. The criteria are public and verifiable against the results; the implementation is not.
The test garden: one garden for all three
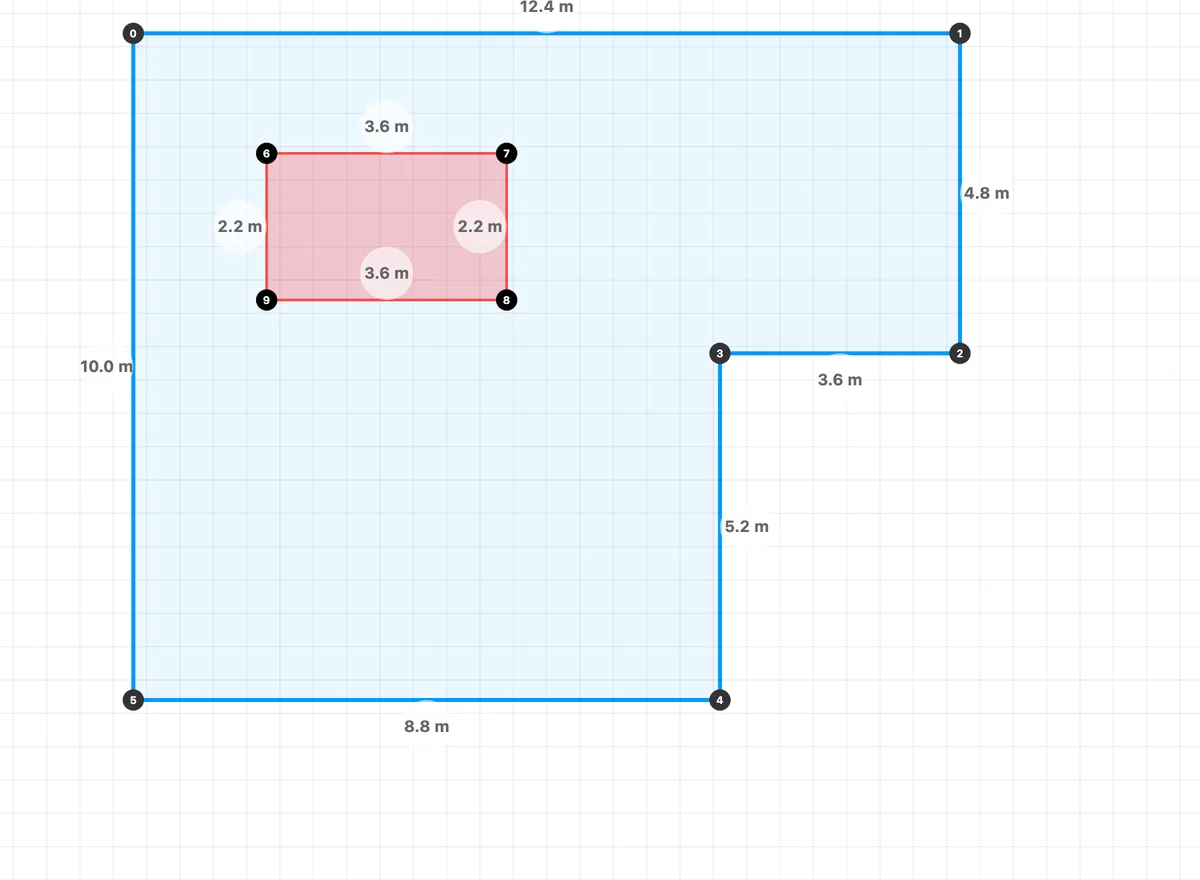
Comparing algorithms on different gardens tells you nothing. Every screenshot on this page comes from the exact same garden, drawn once: an L shape of 12.4 × 10.0 m with a 3.6 × 2.2 m patio excluded, leaving 97.4 m² net to irrigate.
The shape is awkward on purpose: a perfect rectangle would make all three results look alike and would hide exactly the differences you need in order to choose. An L with an excluded area in the middle is what a real garden actually looks like.
Perimeter priority: the installer's layout
What it optimises: keeping water inside the boundaries. It puts a sprinkler near every corner and along the edges, with all throws aimed inwards.
The layout it produces: predictable and easy to read. Sprinklers sit on the edge, so the pipe run can follow the perimeter and the trench stays along the boundary, where it is least disruptive. It is the arrangement an experienced installer would use without doing any maths.
On the test garden: 6 sprinklers, 74.7% of the surface covered. With 90° sectors on the corners and radii between 2.5 and 6.6 m, virtually no water lands outside the perimeter.
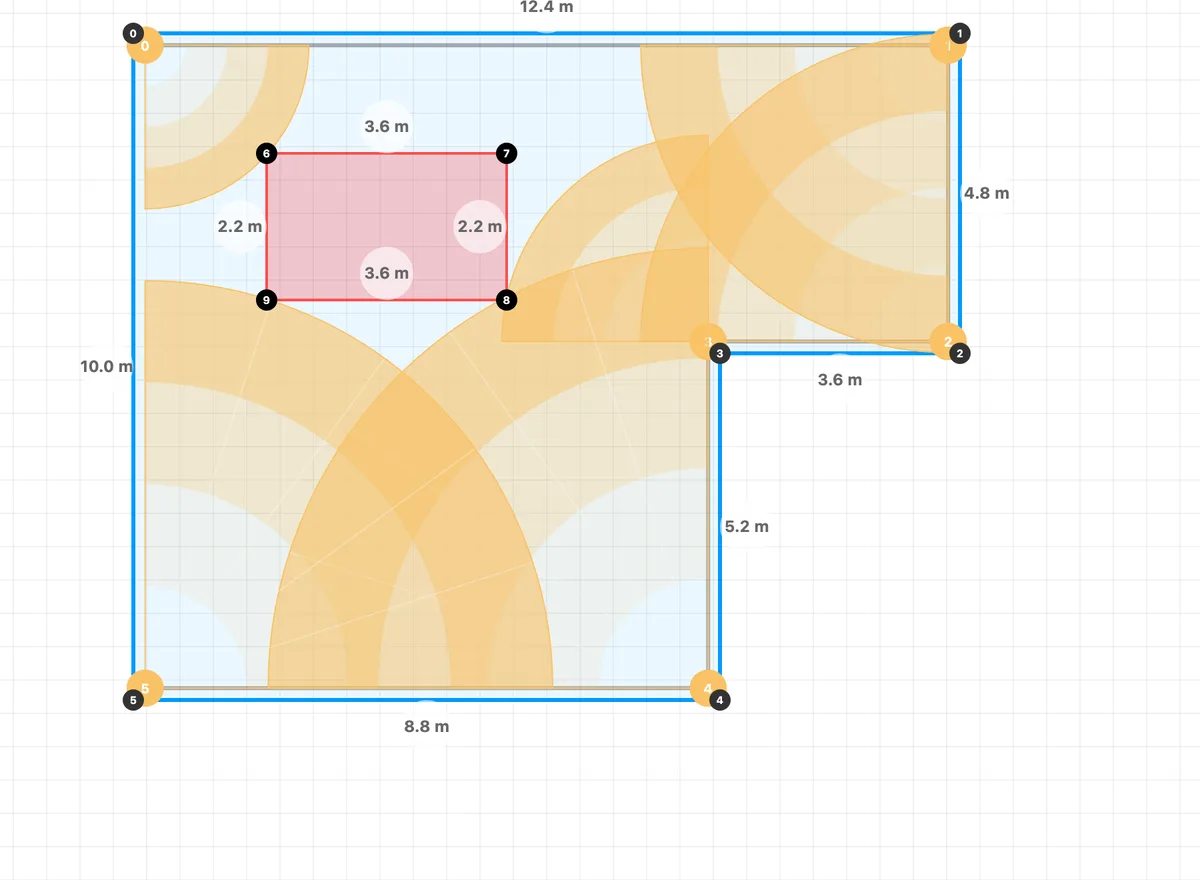
When to pick it: small and medium gardens, regular shapes, and whenever wasting water past the boundary is the main problem — a lawn surrounded by paths, walls or a neighbour's hedge. It is also the easiest to adjust by hand, because the logic of the arrangement is obvious at a glance.
Area priority: covering the surface from the centre
What it optimises: distribution across the surface. It spreads sprinklers over the whole area instead of concentrating them on the edge, grouping the lawn into zones and putting one sprinkler at the centre of each.
The layout it produces: a mesh of interior sprinklers with shorter average radii. On a wide, regular surface this cuts down pointless overlap and keeps the spacing between heads more even.
On the test garden: 21 sprinklers, 47.1% of the surface covered. It is the worst of the three, and it is worth showing rather than hiding: this strategy is designed for large, regular gardens, and an L with an excluded patio is exactly the geometry that defeats it. The surface gets broken into many small zones, each receiving a short-radius sprinkler, and the gaps between zones stay uncovered.
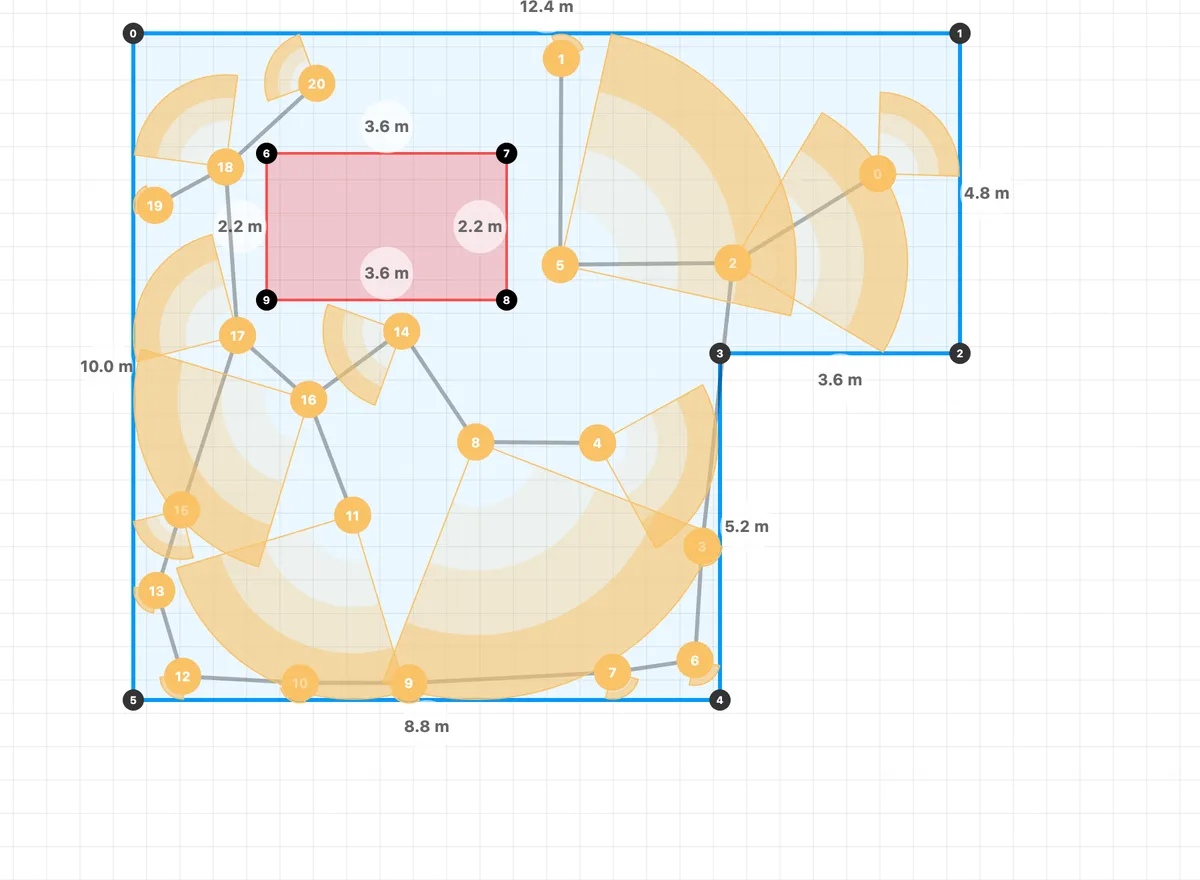
When to pick it: wide, open, regularly shaped surfaces where the dominant constraint is covering the middle rather than the edge. On jagged or narrow shapes, or with excluded areas in the middle, one of the other two strategies is the better choice.
SACO: maximum coverage with the fewest heads
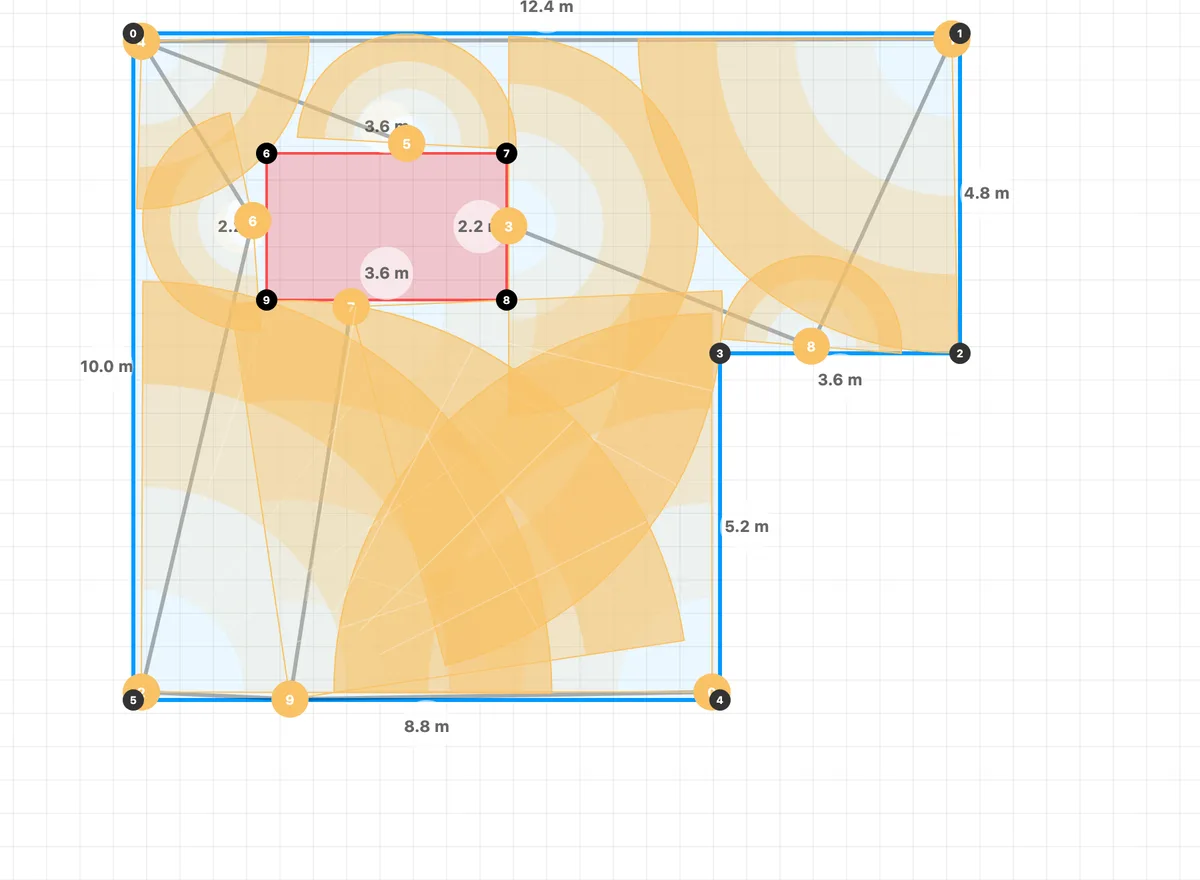
SACO (SprinklerMap Adaptive Coverage Optimizer) is the newest strategy and works differently from the other two: instead of deciding where the sprinklers go and then adapting their radius, it chooses position, radius, direction and sector width of every sprinkler together, judging the configuration as a whole.
What it optimises: a stated goal — covering at least 90% of the garden with as few sprinklers as possible, with no radius below 1 metre.
On the test garden: 10 sprinklers, 87.8% of the surface covered: almost double the coverage of area priority with half the heads, and 13 percentage points more than perimeter priority with 4 heads more. Interior sprinklers appear with wide sectors and long radii that the other strategies never produce.
Two behaviours the other strategies do not have
- It says so when it cannot get there. If 90% is not reachable on that geometry with sensibly sized sprinklers, SACO states it explicitly and reports the coverage actually achieved, instead of silently returning a poor layout. It is the only one of the three that distinguishes between "this is the result" and "this is the best I found, and it is not enough".
- Every press proposes a different configuration. That is not a defect: on the same geometry many arrangements of comparable quality exist, and seeing more than one helps you pick the one that best fits the real obstacles in the garden, which the drawing does not know about. If a layout convinces you, save it — the next press proposes another.
SACO is marked experimental in the app. The layout it produces is a starting point to verify, not a construction drawing.
The three algorithms side by side, same garden
All values come from three consecutive runs on the same 97.4 m² drawing. The percentage is the share of surface reached by at least one sprinkler, measured the same way for all three strategies: a like-for-like comparison, not three different metrics.
| Strategy | Sprinklers | Surface covered | Best for |
|---|---|---|---|
| Perimeter priority | 6 | 74.7% | Small and medium gardens, regular shapes, priority on not overspraying |
| Area priority | 21 | 47.1% | Wide, open, regular surfaces |
| SACO 1.0 | 10 | 87.8% | Irregular shapes, excluded areas, when coverage is what matters |
The sprinkler count should not be read on its own: more heads does not mean more coverage. On this geometry the strategy with the most sprinklers is the one that covers least, because it spreads them where the shape of the surface penalises them. That is why the app offers a choice instead of deciding for you.
A note on the percentage: it measures how much surface receives water, not how evenly it receives it. Those are two different qualities, and the second one is checked with the water simulation.
What automatic placement does not do
Stated limits matter as much as features. Automatic placement:
- Does not know about obstacles you did not draw. A tree, an inspection chamber, a change in level or a patch of compacted soil is not in the drawing, so it is not in the calculation. Areas to exclude must be drawn as holes.
- Does not choose the commercial model. It assigns a nozzle type based on radius — spray below 5 metres, rotator above — but brand and series remain your choice, and they change flow and operating pressure.
- Does not split the system into hydraulic zones. The number of circuits depends on available flow and pressure; that is a separate calculation, described in the calculation methodology.
- Does not account for wind or for slopes above 15%, which distort the real throw compared with the theoretical circle.
- Does not replace verification. A layout with good coverage can still distribute water badly, or apply it faster than the soil can absorb.
So the next step is not installing — it is checking.
Next step: verify the layout with the simulation
Coverage tells you the water arrives. It does not tell you whether the right amount arrives, nor whether it arrives faster than the soil can take it. Those are the two questions the app's water simulations answer, working on the layout you just generated.
How the two water simulations work →
Related reading: the head-to-head rule explains why overlapping throws is not optional, and the design guide covers water need, zoning and the materials list.
SprinklerMap Team — Irrigation technical guides
Software development, garden design workflows and technical review on realistic residential cases. Our story →