80 m² garden: the complete project
Rectangular 10×8 m garden. 2 zones, 6 pop-up sprinklers, 8 drippers. Calculations, layout and parts list.
SprinklerMap

Free tool to study sprinkler positioning in your garden. Draw your garden or map it if you don't know the measurements, use the auto positioning feature and download the materials estimate as a starting point for your project
Drawing, GPS survey and the materials list are free, no registration required. The (free) account is only needed for automatic sprinkler placement and terrain simulation.
A project built by one person who writes automation software and designed the irrigation system in his own garden
From outline to coverage simulation — all in the browser.
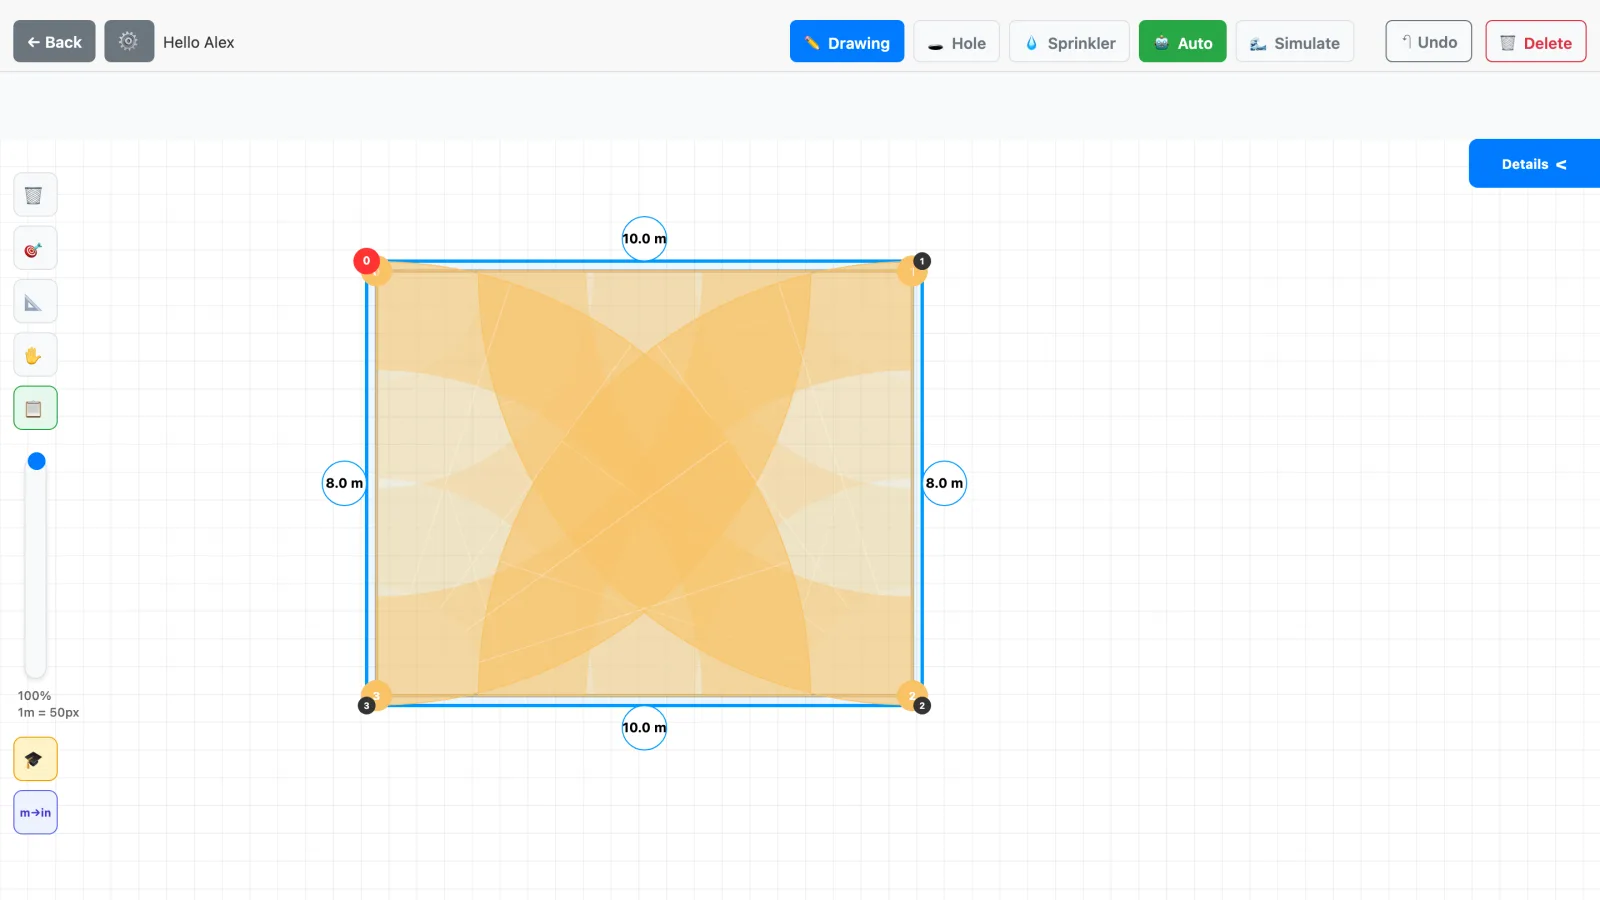
Insert each sprinkler manually or use automation to copy it to the exact point: adjust radius, opening angle and direction with numerical measurements.
The app measures spray overlap and simulates water accumulation over time, showing with dynamic heatmaps where irrigation is optimal or excessive.
Automatically generate sprinkler list with set parameters, calculate pipe meters and distinguish main lines from secondary ones.
When you don't know where to start, the Auto Sprinkler function studies the garden shape and proposes a placement calculated by algorithms designed to balance coverage and waste.
Start the simulation and watch water build up on the ground over time: yellow marks excessive accumulation, red the risk of run-off. Use it to adjust sprinkler direction and arc before you dig.
Once the design is ready you can send it to installers in your area, choosing what to share: layout, materials list, time and cost estimate. Your name, email, phone and address never leave the platform.
A well-designed irrigation system starts with the drawing: knowing how many sprinklers are needed, how far apart to place them and how to split zones determines whether the result works or turns into dry patches, wasted water and rework costs. This tool supports the preliminary design phase with a map editor, coverage calculations and a materials estimate.
A poorly sized system concentrates errors in a handful of critical points: sprinklers spaced too far apart create dry patches on the lawn, pop-ups and drip on the same circuit cancel each other out, unmeasured pressure reduces the real throw of the sprinklers. Catching these problems on the layout before digging costs nothing; fixing them after installation can take days of work and hundreds of euros.
The tool uses satellite imagery to trace the garden's perimeter to real scale. Automatic sprinkler placement follows the head-to-head principle and respects zoning by plant type. The heatmap shows estimated coverage and flags areas with insufficient or excessive overlap, as covered in the Technical Guide.
From the layout defined in the tool, a materials estimate is generated: number of sprinklers by type and model, estimated length of PE pipe for the main line and branches, number of valves and zones. The estimate is indicative and should be checked against the datasheets of the chosen sprinklers and the dynamic pressure available on the real system.
Note: the tool's results are preliminary design estimates. Before installation you need to verify dynamic pressure, real flow rate, friction loss, soil type and sprinkler datasheets. For complex systems, comparing notes with a specialised technician is advisable.
An automatic irrigation system is a network of buried pipes connected to programmable sprinklers that waters the garden on set schedules and durations. Unlike watering by hand with a hose, a fixed system delivers uniformity, water savings and complete autonomy: the garden is watered properly even when nobody is home, during holidays or through a dry spell.
The practical advantages over unscheduled manual watering are several. Water use drops thanks to zone-by-zone distribution and to scheduling in the early morning, the window with the least evaporation. UCANR studies on residential systems in Mediterranean climates document reductions between 20 and 40% after the design is optimised. Plant health improves because each zone receives the right amount of water for what grows there. The lawn keeps an even growth, with no patches burnt by shortage or waterlogged by excess.
Indicative material cost for a basic system on a 50-100 m² garden runs between €300 and €800, depending on the number of zones, the brands and where you buy. Payback depends on the local price of water and on where you are starting from. See a concrete example with a full parts list and prices in the Practical examples section.

The first step is measuring the garden perimeter accurately, identifying fixed obstacles (trees, raised beds, paths, structures) and noting where the water connection sits. For awkward gardens, a drawing tool on satellite imagery lets you trace the perimeter straight onto the aerial photo, removing the need for difficult physical measurements.
Survey your garden with GPS mode →
Water pressure determines the real throw of the sprinklers and the maximum number of sprinklers per circuit. You measure it with a tap pressure gauge (€10-15) screwed onto the outdoor tap. In most homes pressure sits between 2 and 4 bar; the figure that matters for the design is dynamic pressure, measured with other water outlets running in the house.
How to measure water pressure →
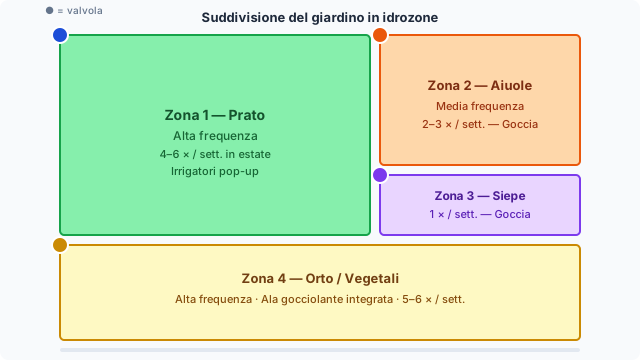
Hydrozones are areas of the garden whose plants share the same water requirement. Lawn needs frequent watering (4-6 times a week in summer); Mediterranean shrubs such as lavender, rosemary and oleander are happy with 1-2; vegetable beds follow their own rhythm. Each hydrozone becomes an independent circuit with its own valve and its own schedule.
How to split the garden into hydrozones →
The head-to-head principle states that the distance between two adjacent sprinklers must equal their throw radius. With sprinklers of 4 metres radius, the maximum spacing is 4 metres. This guarantees enough overlap to compensate for the natural drop in output at the edge of each sprinkler, avoiding the dry patches that appear when sprinklers are spaced too far apart.
More on the head-to-head rule →
Once the layout is set you get an estimate of materials: number and type of sprinklers, estimated length of PE pipe, fittings, valves and controller. Installation means digging a trench 20-25 cm deep, laying the pipe with compression fittings (no welding) and wiring up the controller.
Rotary pop-up sprinklers are the most common choice for lawns: they retract into the ground when idle, have an adjustable radius from 4 to 12 metres and rotate to cover arcs from 40° to 360°. They suit open lawn areas without obstacles. The most widely available models are the Hunter PGP-ADJ, the Rain Bird 5000 and the Gardena Sprinklersystem, priced from €8 to €25 per head.
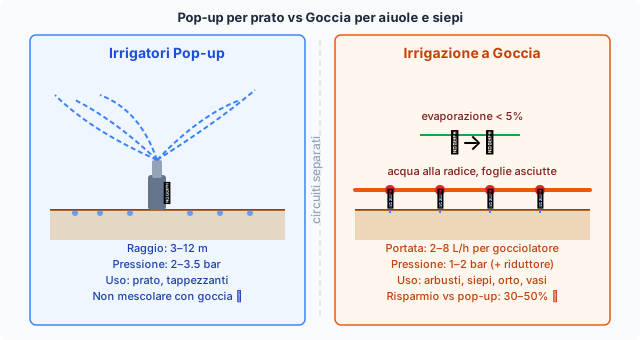
Fixed spray heads (pop-ups with a fixed nozzle) cover shorter radii (1-5 metres) at a much higher precipitation rate: right for narrow strips, small beds or areas full of obstacles. Drippers are the only sensible choice for beds with shrubs, hedges, vegetable patches and anything that dislikes water on its foliage. They run at low pressure (1-1.5 bar) and always belong on circuits separate from the pop-ups, because the operating pressures are incompatible.
The basic rule is never to mix pop-up sprinklers and drip irrigation on the same hydraulic circuit: they need different operating pressures (2.5-3 bar for pop-ups, 1-1.5 bar for drip) and putting them on one pipe makes both systems work badly.
Unscheduled outdoor watering can account for up to half of household summer water use. Careful design with separate hydrozones, a rain sensor and early-morning scheduling can cut consumption substantially compared with hand watering or a badly sized system. The real saving depends on where you start from, on the soil, on the exposure and on your previous watering habits. UCANR studies on residential properties in Mediterranean climates document reductions of 20–40% after the system is optimised.
The rain sensor is the best value component of the lot: it costs €15-30, takes 20 minutes to fit to any modern controller and automatically holds off watering while the soil is still wet. Florida DEP studies on residential samples document annual savings of 15–30% from that accessory alone. Smart controllers with ET calculation (Rachio, Hunter Hydrawise) adjust run times to the daily evapotranspiration derived from local weather data; the EPA WaterSense programme documents reductions of 20–44% against fixed-schedule controllers.
Local rules and summer ordinances often restrict watering during the middle of the day or in drought periods. An automatic system scheduled for the early morning complies with those restrictions by design, without anyone having to remember.
It depends on the size of the garden and the number of zones. For a 50-100 m² garden: €300-600 in materials for a 2-3 zone system. For 200-500 m² gardens: €800-2000. Professional installation labour typically adds 50-80% on top of the materials. DIY installation is within reach of anyone comfortable with basic tools and brings the total down to the cost of materials alone.
It depends on the flow available and on the flow of each sprinkler. Total circuit flow must not exceed 75-80% of the valve’s maximum. With 15 litres/minute available and sprinklers using 2 L/min, the ceiling is about 6 sprinklers per circuit. Going past it causes a pressure drop that shrinks the throw of every sprinkler on that circuit.
Yes. Installing a residential irrigation system is within reach of a moderately confident DIYer. PE pipe joins with compression fittings, no welding. Pop-up sprinklers screw onto standard fittings. The controller connects to a safe 24V circuit. The hardest part is digging the trench: you can do it by hand with a spade (roughly 1-2 hours per 50 m²) or hire an electric trencher.
The recommended minimum is 20-25 cm in areas with mild winters. Where hard frosts are frequent it is worth going down to 30-35 cm to avoid freeze damage. In any case the depth must be enough that mowing the lawn can never reach the pipe.
The controller needs at least as many zones as the design has hydrozones. For residential gardens 2-4 zones cover most cases. Basic battery controllers (€30-60) are fine for simple systems with no mains power nearby. Wi-Fi controllers with an app (€60-180) let you change the schedule remotely and automatically fold in local weather data to save water.
Not just theory: this section collects complete design examples with real measurements, pressure and flow calculations, sprinkler layout and a parts list with quantities and indicative prices. Each example shows a specific case you can use as a starting point for your own garden.
Rectangular 10×8 m garden. 2 zones, 6 pop-up sprinklers, 8 drippers. Calculations, layout and parts list.
The same lawn with 4 badly placed sprinklers vs 6 correct ones. Dry patches, hidden costs and a side-by-side table.
2.5 bar static, 18 L/min. Step by step: dynamic pressure, head loss, sprinklers per circuit.
A ready table with product codes, quantities, indicative prices and installation notes for 120 m² over 3 zones.
The design manual step by step: survey, pressure, hydrozones, pipe sizing and maintenance.
The step-by-step path to design your own system: survey, drawing in SprinklerMap, parts list, trenching and commissioning.
Six real projects with measurements, pressure and flow calculations, layouts and priced parts lists.
In-depth articles on design, installation, water saving and keeping the system in shape.
Answers to the most common questions on pressure, coverage, sprinklers and using the tool.